Showing posts with label Orion. Show all posts

Thursday, December 29, 2016

First Glimpse of Flame Nebula, Adding Data to Orion (M42) and Running Man

My favorite astro image I've created so far would have to be my 2014 image of the Orion Nebula that was lightyears ahead of my previous attempts thanks to my motorized EQ-1 mount and a little practice. I don't do a lot of deep sky images, but when I do I try to go all out and get the best image I can with the gear that I have. That image from 2014 was only 159 subs at 13 sec each for a total exposure time under 30 minutes. This year, I wanted to take another shot at Orion and add some frames to my stack to see if I could get an even better image. I was able to double my frames before the camera frosted up, but the end result isn't all that different.

orion nebula image process
Progression of image processing, (1) single frame, (2) stacked processed photo, and (3) slightly blown out contrast and structure with Instagram edits

I started by doing some reading about polar alignment, and started second-guessing my procedures for trying to get aligned. I've been assuming the division in the concrete patio followed a north-south line because I assume my house faces north - but that may not be precise enough. I got my compass app out (I don't have a 'real' compass) and tried to see where true north is exactly. With the app, it's a little sticky and doesn't exactly scream precision. Nevertheless, it was enough of a difference to convince me that the concrete line shouldn't be my guide.

orion nebula 300mm
Final product, Canon T5i on EQ-1 motorized mount, 300mm, ISO 1600, f/5.6, 13 sec, combining 159 subs from 2014 session with 159 subs from last night 20161228, 20 darks, 20 bias, 10 flats + previous darks, bias, and flats, total exposure time less than 1 hour.

I took out a yard stick and a washable marker and traced a line for north. Then I moved the phone around and the compass moved slightly (ugh). So I traced this new line as well. I took the average of the two and considered it my true north. From the pictures you can tell it's slightly off from the concrete line. The concrete line is about 5ยบ off from compass north.

iphone compass and yard stick

iphone compass and yard stick

marking north on concrete

After taking the light frames, I took some calibration frames. I even took flat frames, which is the photography equivalent of eating your vegetables. I still get a kick out of how dorky the camera looks starring at a blank white screen. A few years ago I would never associate these kinds of steps with better night sky photos - I figured they were all straight out of the camera with mystical amazing gear.

flat frames with laptop screen
Using a computer screen with PowerPoint on a blank slide to create a light panel for flat frames

When I get the images out of DeepSkyStacker (DSS) they look something like this (below), and this is actually after I do some basic curve adjustments in DSS and then transport the image over to Photoshop to continue cleaning it up.

mosaic deep sky stack
Orion nebula stack straight out of DSS before going into Photoshop
So all in all it was an okay night to add some frames to my Orion stack, but I think I need to get over the hour mark (and ideally to 3 hours of exposure) to really see the difference in clarity. It's still grainy and still faint.

Speaking of faint, while I was getting my camera set up I was messing around to see what I could see and how long I could get my exposure without star trails. My EQ-1 motor is inconsistent but every now and then you get something cool. I was able to get about a 25 sec exposure of the Flame Nebula and saw it in my camera for the first time ever. I reduced my exposure down to 15 sec to take a quick stack (knowing my real target for the night was M42). I took 13 frames, 10 were usable, and ended up with something like this after stacking only subs no calibration frames.

flame nebula
Stack of 10 frames each at ISO 1600, 300mm, f/5.6, 15 sec
Curse you gray hot spot in the center! I stacked the images again using my calibration frames from the Orion stack, even though they don't quite match up. I came out with an orange grainy blob, but to my surprise and delight you can barely make out the Horsehead Nebula as well. Unless my eyes are just playing a trick on me.


If you use an HDR effect, my favorite happens to be Instagram's 'structure' edit feature, I know it makes it way too grainy and resizes the image, but I haven't figured out how to replicate it in Photoshop, and if you squint your eyes it really helps bring the Horsehead Nebula out. Proof! Not exactly a glamor shot, but you can tell there is a structure there. Can you see it?

horsehead nebula
Instagram HDR 'structure' edits exported to Photoshop to add dashed stroke path
I think I'm even more excited about the Flame Nebula first sighting than I am about messing with M42 again.

Sunday, November 29, 2015

Quick Nebula Processing with Instagram's Surprisingly Powerful 'Structure' Tool

I spent hours in Photoshop working on my first processing pass of this Orion nebula photo I took last year. It was my pride and joy and I even printed out a hard copy of it to have framed. While I still love the look of the photo, I tried punching it up a bit for a new Instagram post - and I was pleasantly surprised how powerful the 'structure' Instagram tool was for enhancing the dust clouds in this nebula photo. It does go a little beyond the more natural look I'm going for in my nebula processing, but it didn't take it too far into cartoon world.

nebula astrophoto edit in instagram
Orion nebula photo from this post, before and after a super quick Instagram edit with the 'structure' tool
While Instagram really isn't suited to do the heavy lifting for astrophotography processing, this quick tweak was definitely a little icing on the cake before posting the image to social media. I used the editing tools 'structure' and added some saturation and darkened the edges with vignetting. It took like 30 seconds!

orion nebula in instagram
Instagram has the right amount of editing tools, very powerful tweaks and not overwhelming options

Friday, December 5, 2014

Successful Launch of Orion Multi-Purpose Crew Vehicle Test Flight

After a short delay, the first test flight of the Orion multi-purpose crew vehicle successfully launched at 7:05am ET this morning! Woohoo! The impressive Delta IV Heavy rocket looks oddly flat and intimidating because the engines are all arranged in a row and not in a triangle - it's like a wall or row of silos 236 ft tall shooting up into the sky.

Orion has been a long time coming, here is a photo of the Orion training mockup from my trip to the Johnson Space Center exactly two years ago in December 2012:

orion crew vehicle training mockup
My 2012 photo of the Orion training mockup at the Johnson Space Center

If you didn't see the launch live, here is the video on YouTube:

Sunday, November 23, 2014

Massive Improvement in M42 with Orion EQ-1 Motor Driven Mount

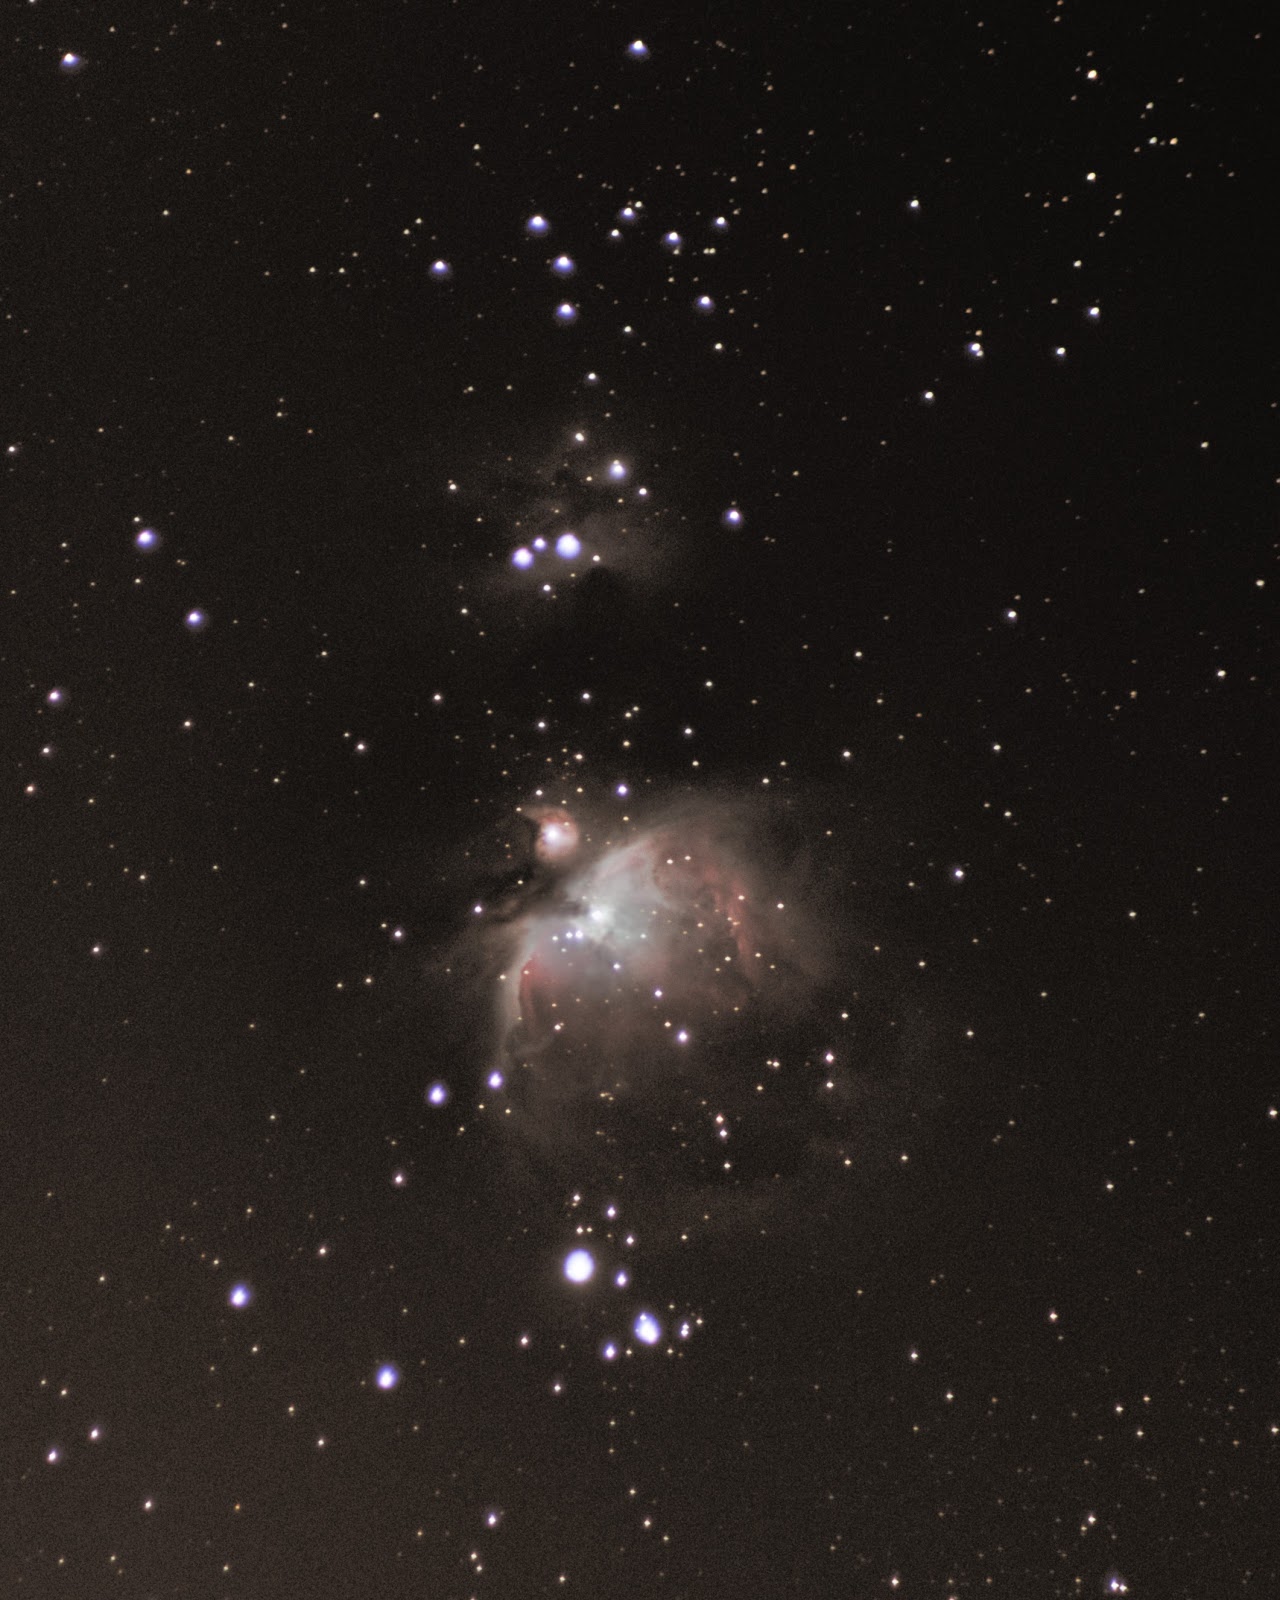
I've been making incremental improvements over the past 2 years, but this was my first time imaging the Orion Nebula (M42) with my motor driven equatorial mount. I did a quick alignment (still trying to figure that out) but was able to get up to about 13 second exposures without star trails. Here is the resulting image:

orion nebula m42 with canon t5i 300mm
Canon T5i on EQ1 mount stacked in DSS, 159 subs, 28 darks, 25 bias, 20 flats, ISO 1600, f/5.6, 300mm, 13 sec, total exposure time about 27 minutes
I did most of my curves in DSS, even though I hear doing curves in Photoshop is a lot better. I just can't get it, but I keep trying. I used Photoshop for a bit of contrast and saturation. I was so pleased with the original color that remained even after stacking in DSS.

improvement in orion m42 photography
It feels amazing to look back on my improvement over the years - I remember being excited about each of these images at one point and now they seem so basic!


I have a lot to learn in processing, but I did make some major progress using flats at my EQ mount for the first time on Orion. Yes that's right! Flat frames! I found this article by BudgetAstro to be the most helpful, because I didn't realize the goal of flat frames is to get the histogram in the middle - unlike dark frames where you just slap the lens cap on and use the exact same settings. I tried using flats before but just used the same settings like dark frames and massively over-exposed my flats, which is pretty pointless because then no gradient or vignette remains.

flat frames
Me taking flat frames in my family room, trying to get the histogram just barely to the left of center. Adjusted exposure time and kept f-number, focus, and ISO the same as my light frames.

flat frames
Tried to get the screen as close to the lens as possible, and moved it around slightly while snapping frames to try to get even lighting
I had massive hot spots in the center of my deep sky images last time, and with the flats this time I didn't have that issue with vignettes. Not saying I had a perfectly gradient-free field, but it was way better than a right gray hot spot.

More gray November skies in the forecast, maybe I'll get some more time to practice my Photoshop curves - but either way I'm extremely proud of my big leap forward in M42!

canon t5i on orion EQ1
A rather blurry shot of my setup, Canon T5i on Orion EQ-1 mount

Sunday, March 2, 2014

Orion Nebula (M42) with Canon T5i on a Fixed Tripod

Shortly after receiving the Canon T5i for Christmas, I went out and did a series of test shots which quickly filled my smaller memory card with 18 megapixel RAW files. I was really pleased with the results, but only got 42 light frames that night. Recently, I was able to give M42 an honest attempt using the fixed tripod stacking method and my new camera with a larger memory card.

I'm still waiting for nicer weather to break out my motor driven EQ mount. I'm a little intimidated by it, and I don't want to fumble with it for the first time in freezing temperatures. So fixed tripod stacking is still the name of the game!

M42 orion nebula
M42 and M43, stack of 107 subs, 77 darks, 70 bias, ISO 3200, 300mm, f/5.6, 1.3 sec

It came out a little bright. That's the trade off I guess, I like how you can see a lot of the very faint nebulosity - making M42 look as big as I've seen it. On the other hand, the interior is over exposed and sort of washed out. I don't do enough of these to really work on my post-processing skills. All in due time!

Monday, December 30, 2013

New Camera (T5i) Test on Fixed Tripod Stacking Method: Andromeda, Orion, Pleiades

I'm easing in to using my new camera, the Canon T5i, so I did a couple test shots on familiar objects using a technique I already know: Stacking short exposure images from a DSLR on a fixed tripod. I wasn't going for a new personal best or anything, but I wanted to take some short stacks to see how the new camera compares to the Rebel XT.

The first thing I noticed was that my memory card fills up A LOT faster with 18 megapixel RAW files. I only got about 150 shots where with the 8 megapixel XT I was getting closer to 250 in a single memory card. I actually filled the memory card, dumped the files, and went back out to shoot more a total of 3 times to take advantage of what seemed to be the one clear night in December.

andromeda galaxy canon t5i
Andromeda (M31) stack of 24 subs, 36 darks, 12 bias at 300mm, f/5.6, ISO 3200, 1.3 sec
orion nebula canon t5i iso 3200
Orion Nebula (M42) crop from stack of 42 subs, 36 darks, 12 bias at 300mm, f/5.6, ISO 3200, 1.3 sec
orion nebula canon t5i iso 6400
Orion Nebula 300mm crop, this time at ISO 6400, 11 subs, 23 darks, 21 bias, f/5.6, 1.3 sec
pleiades canon eos rebel t5i
Pleiades (M45) stack of 34 subs, 23 darks, 21 bias, 300mm, f/5.6, ISO 6400, 1.3 sec
Although I only did short stacks, I may have inadvertently achieved my best effort on the Orion Nebula with very minimal post-processing. Rather than working for an hour to bring out nebulosity, I had a fair amount of gray cloudiness emerge just from the fact that my ISO was higher. I think I like the ISO 3200 Orion better than the ISO 6400 due to the reduced noise. Either way, very promising for just a test shot of less than 50 light frames - and only 11 light frames for the ISO 6400 image!

Saturday, December 28, 2013

Canon EOS Rebel T5i ISO Test on Orion, Andromeda, and the Pleiades

I just got the Canon EOS Rebel T5i for Christmas, and I used it for the first time last night! I was able to photograph a few popular celestial objects, and I wanted to make some test sets to see the level of noise at ISO higher than what I was using previously (Rebel XT only goes up to ISO 1600).  What do these night sky objects look like at ISO 3200, ISO 6400, and ISO 12800? All of these tests are with single frames on a fixed tripod in 25ยบF clear weather about 20 miles outside a large city.

Andromeda (M31) shot at ISO 3200, 6400, and 12800

Orion Nebula (M42) shot at ISO 3200, 6400, and 12800
Orion Nebula (M42) shot at ISO 3200, 6400, and 12800

The Pleiades (M45) shot at ISO 3200, 6400, and 12800
The Pleiades (M45) shot at ISO 3200, 6400, and 12800

As you can see the noise goes up a great deal between ISO 3200 and ISO 6400, but I think the jump in noise from ISO 6400 to ISO 12800 is a deal-breaker when it comes to using it for astrophotography. I think I'll try stacking some images to reduce noise in the 3200 and 6400 range.

Hopefully when I get my motorized EQ mount set up I won't have to resort to such high ISO to reveal faint deep sky objects, but this was a fun little experiment using fixed-tripod techniques I'm already familiar with!

Canon EOS Rebel T5i
Canon EOS Rebel T5i

Thursday, November 7, 2013

November Morning Sky ft. Orion and the Seven Sisters

I woke up to take the dog out at 5:00am this morning, and saw that the sky was clear. Sirius and Jupiter were blazing in the crisp, alarmingly cool air. It's been raining for the past few days, so I was super excited to get outside and get some photos.

I started on the balcony with a wide angle shot of the Orion neighborhood (from Sirius to the Pleiades). I tried a bunch of different settings to see if I could stumble upon something cool, or find a way to increase the number of stars without adding to the light pollution. Here's the final result...

orion night sky 18mm
Final result with adjustments in Adobe Camera RAW
Below is the same photo pre-adjustments in Adobe Camera RAW. Notice the prevalence of sky glow and washed out stars. At least the stars were sharp, unlike the shot I took with the aperture wide open.Check out the results from a variety of settings...

orion and night sky f/4.5
Same photo as above, f/4.5, 15 sec, ISO 800, 18mm unprocessed


adobe camera raw remove sky glow
Screen shot of Adobe Camera RAW (check the settings on the right if you want to do something similar)

night sky f/3.5
Trying the same scene with different settings, f/3.5, 15 sec, ISO 800, 18mm (wide open aperture isn't as sharp)

stars f-stop f/11
Trying the same scene with different settings, f/11, 15 sec, ISO 1600, 18mm (very sharp but not much light coming in)

Thursday, April 11, 2013

Adding 112 subs to my Orion stack

In February I stacked a series of 168 subs, 30 darks, and 30 bias frames to create my best attempt at the Orion Nebula (M42). Now, with Orion getting lower and lower in the sky, I wanted to try adding to the stack before the constellation dips below the horizon. Unless I get an exceptionally clear night, this is probably going to be my last Orion attempt of the season.

I added another 112 subs to my stack (no additional dark or bias frames) for a total of 280 subs. Because I noticed quite a few were trailing or out of focus, I kept only the best 70% for a total of 196 subs - which I believe is around 4 min 21 sec total exposure time.

This new set was shot using the same ISO and magnification, but at 1.3 sec rather than 1.6 sec. Deep Sky Stacker gave me a warning message, but handled the difference in exposure times remarkably well.

196 frames at ISO 1600, 300mm, f/5.6, 1.3 and 1.6 s frames
This is a fairly quick pass at processing, I'm a little rusty since I almost never do deep sky stuff! Not much in the way of color, but the dust cloud is large and clearly visible. I also captured a whiff of the Running Man Nebula about 1/2 degree above the Orion Nebula. The running man is actually a combination of 3 objects (NGC 1973, NGC 1975 and NGC 1977) separated by some dark space in roughly the shape of a person. In my image you can only see a little blob of gray.

Monday, February 11, 2013

Orion's Belt is a busy neighborhood

orion's belt 130mm lens
Orion's Belt and sword (including M42)

This image of Orion's Belt is made up of 129 subs, 25 darks, and 25 bias frames stacked in Deep Sky Stacker (DSS). Each frame was taken at 130mm, f/4.5, 2 sec, ISO 1600 with a Canon Rebel XT on fixed tripod.

Orion's Belt and Sword labeled in Photoshop

As you can see, the three stars that make up the sword are actually a whole mess of stars and nebulous gas clouds that only appear to be 3-4 individual stars to the naked eye in moderate viewing conditions.

Update 3/18/2013: I uploaded this image to Astrometry.net and it was able to tag a LOT more objects in my field of view! Wow, what a cool service!

My same image automatically annotated with Astrometry.net

Monday, February 4, 2013

Reprocessed M42 with larger dust cloud

After watching a couple stellar video tutorials by Anna Morris, I decided to put some of her techniques to work on my M42 stack from last month.

Here is my reprocessed image, with emphasis on bringing more of the dust clouds forward.

m42 reprocessed orion nebula photoshop


And here is the same image with an insert comparing my previous processing attempt to this one. I'd say there's some improvement!

m42 photoshop

Wednesday, January 9, 2013

Practice makes... Orion visible without a tracking mount

Check out my deep sky progress using the same camera (Canon 350D) to photograph the Orion Nebula. It's an easy target in the winter, and I've definitely been improving! It seems like every new technique I try produces the "best one yet!"

orion nebula with canon 350D
My first successful image in Deep Sky Stacker (DSS)

Well, here is my best Orion Nebula yet! It's a stack of 168 subs, 30 darks, and 30 flats bias (I finally figured out what those are). Each was shot in RAW at 1.6 sec, f/5.6, 300mm, ISO 1600. I stumbled through a couple tutorials on Deep Sky Stacker (DSS) and ended up stacking this a few times. The first time it removed all the color for some reason, the second time it wouldn't let me adjust the TIF in Photoshop, and the last couple times I actually got a workable image.

I blew the color and contrast way out because I'm new and I still think that looks impressive - even though it's exaggerated to the point of looking kinda fake.

Improvement in Orion photos
All taken with the same camera and different amounts of knowledge

Here are a couple tutorials that I found EXTREMELY helpful! I really can't stress that enough - I went from zero to DSS in about 24 hours! I never thought I'd be able to take photos like these without a tracking mount. I'm so pumped!


Update: I believe my 'flats' were actually 'bias' frames, I'm not sure how that may have affected my DSS session but I might try re-stacking with my bias frames in the appropriate spot.

Thursday, January 3, 2013

Manual image stacking in Photoshop for the Orion Nebula

I don't have a tracking mount, so the only way I can add time to my exposures of deep-sky objects is by stacking. Unfortunately, when I have my 300mm lens maxed out, the objects begin to create light trails in as little as 6 seconds - not much exposure time at all!

To clean up my images, I'm trying a manual stacking technique in Photoshop that involves stacking 5 images into bundles, and then stacking the bundles. The first image is the background, followed by semi-transparent layers at 50, 33, 25, and 20 percent opacity.

That's how I created the image below! I used 10 total images (each 6 sec at ISO 1600), and stacked them by hand in Photoshop into 2 bundles of 5, and then stacked the bundles. The hardest part is lining up the nebula in each frame because as it moved toward the edge of my field of view there was some lens distortion. My next step is to learn how to use Deep Sky stacking software so I don't have to spend 30 minutes getting the frames to line up!

orion nebula photoshop stack
Final product stacked and aligned by hand in Photoshop


Here is a side by side comparison of one 6-second frame next to the final product.

orion nebula photoshop stack
Single 6-sec exposure (L) and final product (R)


Here is a crop of the Orion Nebula - my best deep sky photo yet!

orion nebula photoshop stack
Stack of 10 images each 6 sec ISO 1600
P.S. Happy 100th post to me!! I'm so glad I started this blog, it has kept me motivated to learn and serves as a great archive of my process and content!


Friday, November 16, 2012

Star trails over Bowling Green on a cold November night

After my excitement over the Orion Nebula and Jupiter in my last post, it's good to get back to some fun star circles - except it was freezing outside tonight! Where Jupiter is a quick pic, I forgot how boring it can be making star trails (especially when it is 28 degrees out).

star trails with canon rebel xt
98 stacked images, 25 sec each, ISO 200

This was my first stacked star trail image on the Canon Rebel XT. Since there was no moon to auto-focus on, I tried focusing on the apartments about 200 yards away. It seemed to work, plus focus isn't as critical with trail pics anyway. Notice how the trails aren't as dotted with the Canon Rebel XT! That's because the camera doesn't have to process for 10 seconds between each photo. Woo!

light pollution and orion
Beautiful light pollution (an oxymoron?)

This was one of my test images before I taped the shutter button down. I think it's pretty cool! It's almost like an inverted Northern Lights. Parking lot light pollution never looked so magical.

star trails over bowling green ohio
Rather messy, stacked right over myself in the foreground

self portrait with orion
Self portrait frame from previous stack

portrait of my camera
Photo of the Rebel XT from the PowerShot

photo looking up below tripod at stars
Looking up below the tripod