Wednesday, December 31, 2014

Comet Lovejoy Shines Green on New Year's Eve

One last post in 2014 ya'll! Here is Comet Lovejoy C/2014 Q2 at 10pm ET tonight, taken with my DSLR on a fixed tripod and stacked in Deep Sky Stacker. In spite of the bright moon, the skies were completely clear and the green color showed up without cheating the saturation up at all!

In Photoshop, I stretched the histogram in levels by sliding the gray slider to the left, then used the eye dropper in Curves to identify the grays and turn them up. Next, I created a Gaussian blur layer and subtracted it to get rid of the slightly red hot zone that I had from not taking flat frames.

comet lovejoy new years eve
Canon T5i on fixed tripod, stack of 46 light, 21 dark, 12 bias, 205mm, f/5, ISO 3200, 1.6 sec
new years eve comet lovejoy
Crop of the above image


Happy New Year everyone! See you in 2015!

Comet Lovejoy C/2014 Q2 in Lepus

Comet Lovejoy C/2014 Q2 is currently in the constellation Lepus, and the celestial rabbit's bunny ears made excellent pointer stars to help locate the comet last night! The comet was visible with binoculars and with my DSLR even through thin clouds. Tonight is supposed to be crystal clear, so I might make another attempt to photograph it since I don't really have any NYE plans.

comet lovejoy c/2014 q2 75mm DSLR
Brightness, contrast, and saturation adjusted in Photoshop

comet lovejoy c/2014 q2 75mm DSLR
Original image, single frame with Canon T5i, ISO 3200, 75mm, f/4, 6 sec

Tuesday, December 30, 2014

Light Painting in the Backyard

Although it's been the third least snowiest December on record in central Indiana, I think I could count the number of clear nights on one hand. When the skies aren't cooperating, I get a little stir crazy - so I had to battle my friend Luke in the backyard using my epic lightning powers!

lightning iphone light painting power
Light painting using SlowShutter Cam app for iPhone, merged and adjusted in Photoshop

FOCUS: To focus the image, have the subject stand in the spot where they will be during the photo and shine the light on themselves - try lighting up the face and clothes, just enough to give the photographer a target. Lock the focus on the subject when they are bright enough to autofocus.

LIGHT THE SUBJECT: Now start the photo with a 3 second delay and run over to the subject. First establish them in the image by shining the light away from the camera toward the subject - simulating a flash essentially. Paint their body with light for a few seconds.

DRAW WITH LIGHT: Now with the flashlight aiming toward the camera, paint the lines you want to show up. We used a simple white LED keychain for these.

I realized when I upgraded my iPhone, I also made my Glif mount for the iPhone 5 less useful - seen here with my new iPhone 6 (in a case) rubber banded to it to hold it in place... Apparently they make a new Glif iPhone tripod adapter mount that is more universal and accommodates the curved edges of the new iPhone 6.


Ok so here is what the photos look like straight out of the iPhone using Slow Shutter Cam app as the camera...

lightning iphone light painting power
Image straight from iPhone with brightness adjustment in Snapseed app

shoot energy from hands light painting
Image straight from iPhone, taken with Slow Shutter Cam app in light trail mode
I also tried light painting with my Canon T5i. I made the image below by stacking several frames in Photoshop and using blend mode Lighten to only incorporate the lightest parts from each image. I painted the birch trees and step stones with a white LED.

I think it looks a little like lightning! I really like the blue glowing energy in this image!

light painting highlight trees and stones
Stack of 5 images, each at f/7.1, 18mm, ISO 400, 16 sec

Examining Cool #14 Welder's Glass Eclipse Shades

My sister got me these cool eclipse viewing shades for Xmas! They look like normal sunglasses, which is a lot cooler than those paper eclipse shades they hand out at viewing parties, and a lot more functional that just getting a sheet of black polymer. They are comfortable and feel very sturdy.

welder glass eclipse shade
Phillips Safety Products No.14 Welder's Glass Eclipse Viewing Shades
They look like bug-eye regular sunglasses, but once I put them on I immediately realized these were no normal sunglasses. I couldn't see a thing! It's clear that these No. 14 Welder's Glass green shades filter much more light than the typical pair of sunglasses.

Check it out, when I hold them up to the light, you can't even see through them!

welder's glass block light

The glasses also come with these protective side shades. The material looks similar to what the frames are made from, but not the same thing as the lenses of the glasses. I wanted to check them out, so I held them up to the bathroom light too and could see through it. These definitely don't filter as much light - so never use the side shade thing to look at the sun!

welder's glasseswelder side shade light through

I think the reason they give you these side extension is to help block light coming in from the sides. When you look at the sun, because the black glass is reflective you can end up being distracted by the reflection of your own eye looking back at you. These side shades help a little bit, but I ended up taking them off and just using my hands to block light on the sides.

I guess the other reason is because these are literally welder's safety glasses, so the side shades probably help protect your eyes from sparks. 

welder safetly glasses solar viewer

This is my first time looking at the sun through welder's glass, which makes the sun appear an eerie green! It's still pretty bright, I'm not sure if you'd be able to see any sun spots with welder's glass - but it sure does give you a nice view of the sun's disk, which is what really matters during an eclipse.

sun is green dot through welder glass
Welder's glass = Green dot

black polymer solar shade
Black polymer = Orange dot

Monday, December 22, 2014

Camera Settings for Christmas Lights

We've had so many gray cloudy days and nights this season so far! It's driven me outside to try to photograph anything resembling stars, in this case Christmas lights! Ok, the first thing I learned right off the bat is that Christmas lights are not stars, and do not use the same settings as stars. But I sort of have a reputation for being able to take photos at night, so it was definitely worth while to play around with some camera settings for Christmas lights to keep up that night-time photographer street cred.

1. Use a high f-stop number (narrow aperture) to get pretty lens flares around the lights. This also works with bright stars and planets! Usually when I shoot stars I shoot with a wide aperture to let in the most light (low f-number), but this is not the ideal setting for Christmas lights.

christmas light camera settings
Very high f-number, very low ISO to reduce noise, and adjust seconds until you have it how you like

2. You don't have to worry about star trails, so you can use a looooong exposure. I tend to use a wide open aperture for stars to maximize the amount of light I let in as quickly as possible before the stars move, but with Xmas lights this isn't an issue. Keep it narrow and long!

different camera settings for christmas lights
Variety of camera settings all using ISO 100

3. Low ISO to reduce background noise. You have all the time in the world, the house isn't moving, so use super low ISO and longer exposures. Let the individual lights show, or you'll end up with a big bright blob in the bushes.

xmas light camera settings
ISO 200, 22mm, f/9, 15 sec
xmas light camera settings
A little over-cooked! ISO 800, 22mm, f/9, 15 sec

4. Turn off indoor/window lights and porch lights, let the ambient light show the house. If you are doing a whole house shot, porch lights might drown out the Christmas lights. I prefer to let the glow from the lights reveal the house.

Sunday, December 14, 2014

Clouded Out for Geminids 2014, Some Consolation Prizes

After two successful Geminid captures (particularly last year) I guess the weather wasn't in my favor this year. I made an attempt at photographing the Geminids meteor shower on December 11, 2014 at 9:11pm. It was a completely clear evening and sunset, and started with a clear sky - but I think the warm air during the day led to a blanket of clouds after sunset even though the forecast actually looked very promising!

As with any failed meteor attempt, you always walk away with some consolation prizes in the form of star trails or even a couple neat sky pics. Here's what I managed - no meteors but a nice view of my favorite constellation Perseus over my neighbor's unfinished house:

perseus constellation over house
Canon T5i single frame f/4, 18mm, 15 sec, ISO 800

perseus constellation over house with clouds
Canon T5i single frame f/4, 18mm, 15 sec, ISO 800 about 20 minutes later...

cloudy star trails over house
92 images stacked in StarStaX

night sky photo edited snapseed
Photos above adjusted in the app Snapseed using the 'Automatic' filter, it does some quick work!

I made the images into a timelapse video: 152 individual frames taken with Canon T5i, each at f/4, 18mm, ISO 800, 15 sec; Timelapse in Sony Vegas with 0.07s still image duration each.

Friday, December 5, 2014

Successful Launch of Orion Multi-Purpose Crew Vehicle Test Flight

After a short delay, the first test flight of the Orion multi-purpose crew vehicle successfully launched at 7:05am ET this morning! Woohoo! The impressive Delta IV Heavy rocket looks oddly flat and intimidating because the engines are all arranged in a row and not in a triangle - it's like a wall or row of silos 236 ft tall shooting up into the sky.

Orion has been a long time coming, here is a photo of the Orion training mockup from my trip to the Johnson Space Center exactly two years ago in December 2012:

orion crew vehicle training mockup
My 2012 photo of the Orion training mockup at the Johnson Space Center

If you didn't see the launch live, here is the video on YouTube:

Tuesday, December 2, 2014

Capture Meteor Photos with iPhone: What You'll Need

For the upcoming Geminid meteor shower, I'm planning to put out as many cameras as I can to increase my chances of catching a handful of big bright meteors! This includes my iPhone with the updated version of NightCap Pro, which has been shown to be capable of catching meteors with nothing but your phone!

Using NightCap for meteors photos with your iPhone, select Night Mode , and Long Exposure (aka Star Trail) to create a long exposure photo waiting to capture meteors that fly by. 

iphone meteor photo
Shooting star captured on iPhone using NightCap - Photo from NightCapCamera.com

Here's my plan:

I'm going to attach my iPhone to a tripod using the Glif tripod mount. I'm still using the iPhone 5 until I upgrade in January, so I have the iPhone 5 version, but I see they have a new universal adapter for just about any phone.

iphone tripod for meteor photos
iPhone 5 with Glif tripod adapter

If you want to go super cheap, you can also make a tripod adapter out of a binder clip - but this will wobble in the wind so it's not really the best solution. 

A big concern is battery life while taking a long exposure photo in the cold. You're going to want to plug your phone in to keep it charged. The combination of camera apps and freezing air really drains it fast. If you absolutely don't have access to a power source, you can try something I learned a while ago which is to give your iPhone a little winter coat made out of a plastic bag - it helps keep your phone protected from the freezing wind for a little while but it's not the ideal solution.

extend iphone battery cold
iPhone wearing a plastic bag winter jacket with a hole cut for the camera to peek through
Get everything set up and then leave it alone. As long as you have it plugged in, the phone shouldn't die in the cold and you should end up with a nice star trail photo dotted with meteors.

Monday, December 1, 2014

Watch 2014 Geminids Meteor Shower Peak December 13-14

The Geminids meteor shower is my favorite of the year, and the one I've had the most consistent luck observing and even photographing! I really can't say enough about this great meteor shower, it was my first one since taking up skywatching as a more intentional hobby.

It's a fun memory because on both nights I photographed the meteor shower I went to midnight showings of The Hobbit. In 2012 we saw meteors through the car windshield while driving to the theater, there were so many of them! In 2013 I got back from the theater in the middle of the night and set up my camera on the balcony to shoot away - I was exhausted from seeing a double feature and let the camera do the observing for me. 

how to watch 2014 geminids
Canon Powershot - My best Geminid meteor photo from 2012
how to watch 2014 geminids
Canon Rebel XT - My best Geminid meteor photo from 2013

Here are a few lessons I learned in the past 2 years trying to observe and photograph the Geminids meteor shower:

1. Keep looking in the same spot with a view of the most sky possible in the general direction of the apparent radiant. I used to think you had to look at the exact radiant point - the spot the meteors appear to be coming from. But you actually see much longer trails a little further away from that point. Just look where you have a comfortable view of the most sky possible.

2. Use a high enough ISO to capture the quick faint meteors. I started using ISO 400 and saw a bunch visually but didn't catch anything on the camera. Now I use ISO 800 in 15 second exposures. Find a high ISO that isn't too noisy.

3. Stop moving the camera! This is just random chance, and a natural tendency to want to point the camera to where you saw meteors in the past. Well lightning doesn't strike the same place twice, does it? (Actually, it does, but that's not the point). So keep your camera in one spot and let the meteors come to you - just keep your fingers crossed.

4. You might still see meteors even if the moon is out, and even if you have light pollution. A lot of astrophotography sites will complain about the horrid moonlight ruining the show - but don't let that discourage you. You're not looking for professional photos, so go out and give it a try, or just go take a look. You never know what you'll see!

5. You can still see meteors even on the non-peak nights. In fact, you can see Geminids from around December 4 to December 17. So, if your forecast looks miserable on the actual peak night, have a go a little early or late. I actually got my best photo the day before the peak last year.

6. What camera settings? From suburban skies, I like 18mm (as wide as possible), f/4.0 (as open as possible), ISO 800-1600, then adjust the time to avoid washing out the sky, for me that's about 15 seconds each.

7. Without meteors, star trails are a consolation prize! If you've snapped hundreds of frames with no meteors, you have a nice batch for star trails - a beautiful consolation prize after a long cold night!

Sunday, November 23, 2014

Massive Improvement in M42 with Orion EQ-1 Motor Driven Mount

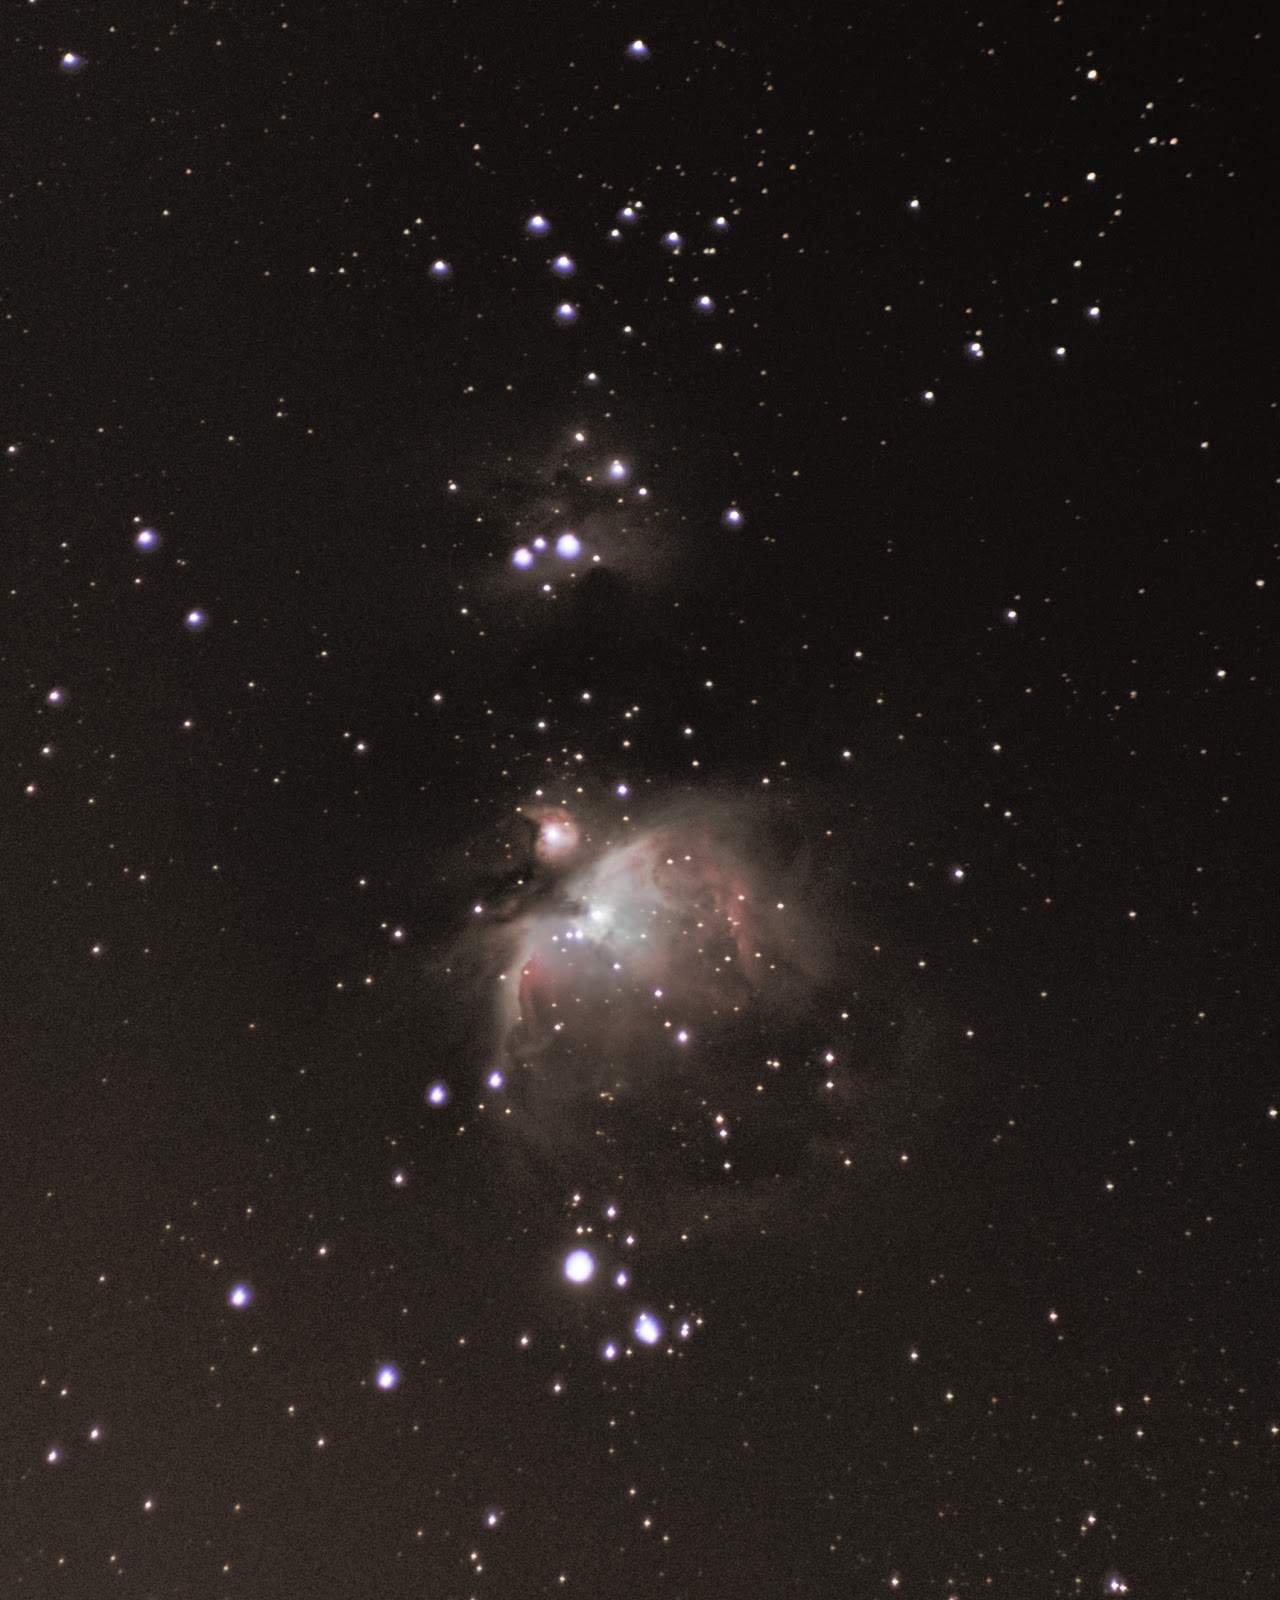
I've been making incremental improvements over the past 2 years, but this was my first time imaging the Orion Nebula (M42) with my motor driven equatorial mount. I did a quick alignment (still trying to figure that out) but was able to get up to about 13 second exposures without star trails. Here is the resulting image:

orion nebula m42 with canon t5i 300mm
Canon T5i on EQ1 mount stacked in DSS, 159 subs, 28 darks, 25 bias, 20 flats, ISO 1600, f/5.6, 300mm, 13 sec, total exposure time about 27 minutes
I did most of my curves in DSS, even though I hear doing curves in Photoshop is a lot better. I just can't get it, but I keep trying. I used Photoshop for a bit of contrast and saturation. I was so pleased with the original color that remained even after stacking in DSS.

improvement in orion m42 photography
It feels amazing to look back on my improvement over the years - I remember being excited about each of these images at one point and now they seem so basic!


I have a lot to learn in processing, but I did make some major progress using flats at my EQ mount for the first time on Orion. Yes that's right! Flat frames! I found this article by BudgetAstro to be the most helpful, because I didn't realize the goal of flat frames is to get the histogram in the middle - unlike dark frames where you just slap the lens cap on and use the exact same settings. I tried using flats before but just used the same settings like dark frames and massively over-exposed my flats, which is pretty pointless because then no gradient or vignette remains.

flat frames
Me taking flat frames in my family room, trying to get the histogram just barely to the left of center. Adjusted exposure time and kept f-number, focus, and ISO the same as my light frames.

flat frames
Tried to get the screen as close to the lens as possible, and moved it around slightly while snapping frames to try to get even lighting
I had massive hot spots in the center of my deep sky images last time, and with the flats this time I didn't have that issue with vignettes. Not saying I had a perfectly gradient-free field, but it was way better than a right gray hot spot.

More gray November skies in the forecast, maybe I'll get some more time to practice my Photoshop curves - but either way I'm extremely proud of my big leap forward in M42!

canon t5i on orion EQ1
A rather blurry shot of my setup, Canon T5i on Orion EQ-1 mount

Saturday, November 8, 2014

Ring Around the Moon, Rainbow Lunar Halo Tonight

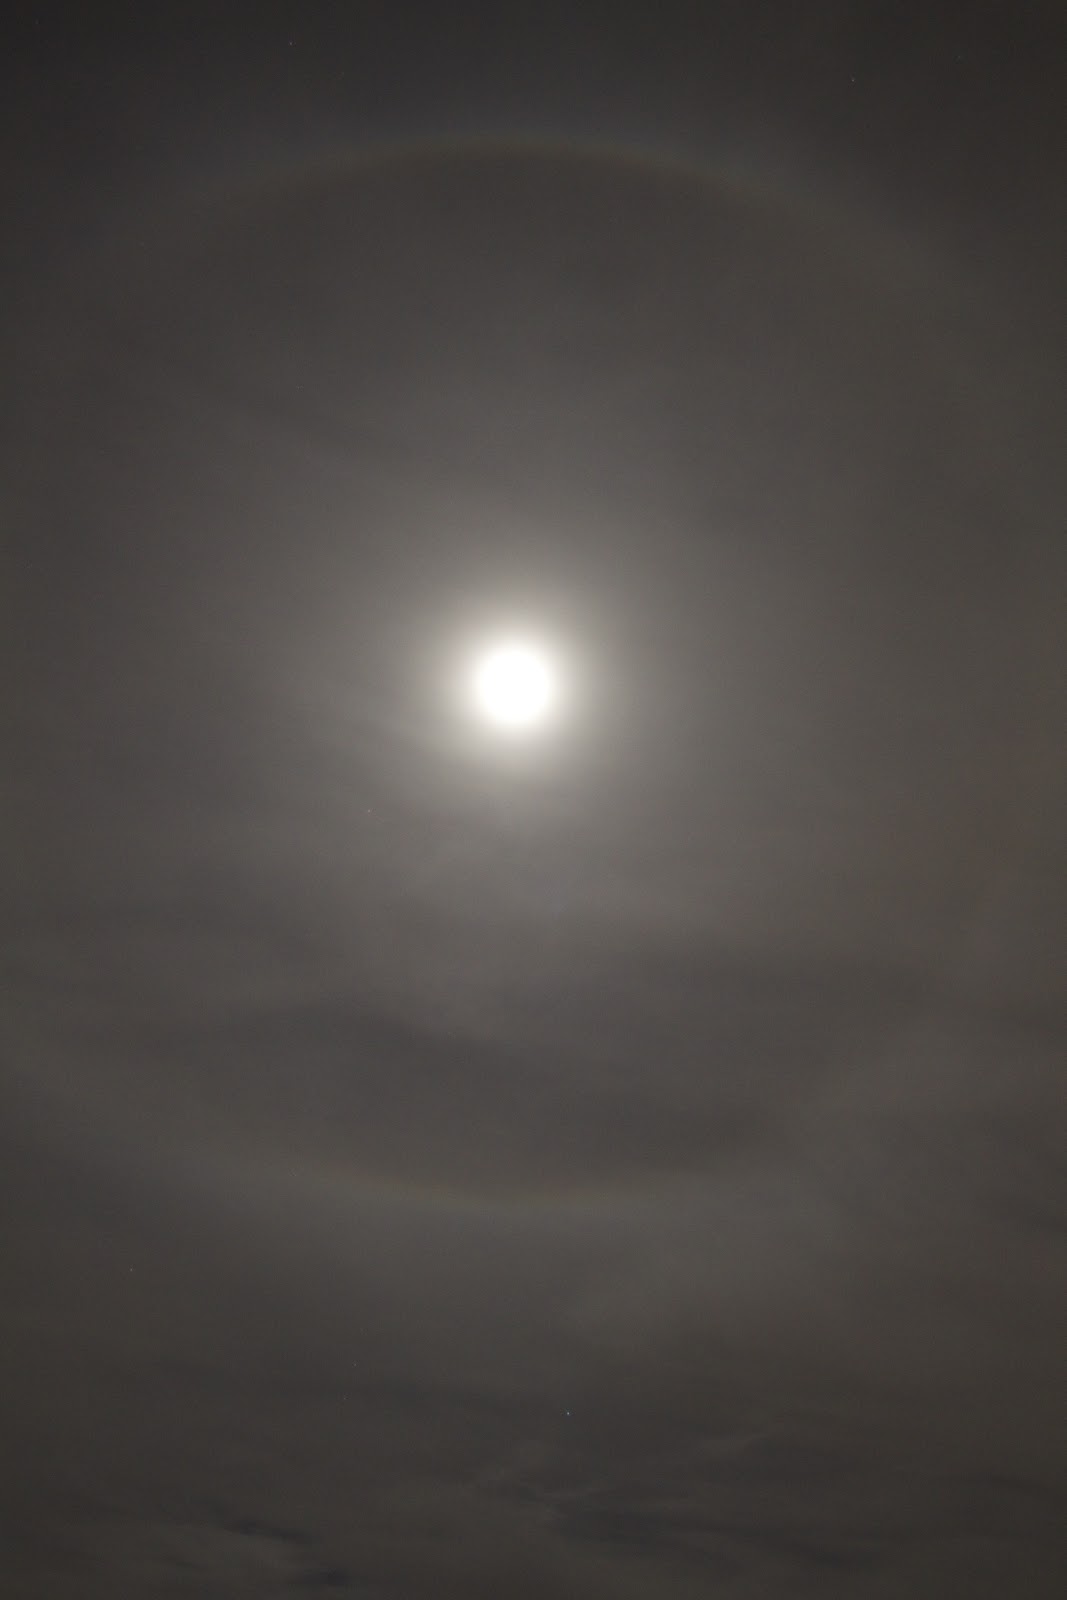
Tonight there was a ring around the moon, a rainbow lunar halo (a 22º halo to be exact). As light passes through hexagonal ice prisms in the upper atmosphere, no light leaves the prisms at an angle less than 22° making a distinct light/dark boundary with a radius of 22° radiating out from the moon.

I believe this is my third time photographing a lunar halo - my first time was most impressive visually but faded when I went back inside to get my camera. My second time was a bit better last November in Brownsburg.

This time my lunar halo wasn't broken up by a contrail, and was clear enough to see the rainbow (or 'moonbow') effect of the light splitting into different wavelengths. These lunar halos can happen throughout the year, because the upper atmosphere can be cold enough for ice crystals even when the temperature below is much warmer - but I've only ever seen it in the colder months.

ring around moon tonight halo
Single frame with Canon T5i, ISO 800, 18mm, f/4, 2.5 sec

halo ring around moon iphone
Lunar halo with iPhone and NightCap app

lunar halo moonbow 55mm
Close-up of the lunar halo moonbow, single frame with Canon T5i, ISO 1600, 55mm, f/5.6, 3.2 sec, saturation and contrast tweaked in iPhoto


Friday, November 7, 2014

Download & Install EOS Utility Without CD on Windows 8

I want to use Canon EOS Utility with my Canon T5i, but my laptop doesn't have a CD drive - so even though I have the CD to install EOS Utility in hand, I can't get it onto my computer! I went to the Canon website to try to download the software, but they only have an updater and not the actual application. What the heck!

Luckily there is a work-around that I found online. This video was super helpful (there's also one for OSX), but I can't stand tutorial videos because they always take forever and I just want to see some quick screenshots to guide me through the process. I guess it's just a personal preference. In any case, here are the steps - worked like a charm!

install eos utility
Go to the Canon website and click on 'Service & Support' and enter your camera model...

install eos utility
Under 'Drivers & Software' click on Software and check the box next to EOS Utility Updater for Windows, then click Download...
install eos utility
Download and open the ZIP file...
install eos utility
And launch the updater program... What do you think will happen?
install eos utility
It tries to locate the original software to update it, and then it looks for the CD to be in the CD drive... but I don't have a CD drive! So here comes the trick... Go ahead and close this window...
install eos utility
Search for 'regedit.exe' and run the application... You'll get a warning asking if you want to allow changes to the Registry, so hit yes...
install eos utility
Expand the folders 'HKEY_LOCAHL_MACINE' and 'SOFTWARE'...
install eos utility
Click on the folder within 'SOFTWARE' called 'Wow6432Node', right click and create a new Key...
install eos utility
Name the new key 'Canon' and then create a new Key within this new Canon folder you just made... Name this Key 'EOS Utility' and type carefully.
install eos utility
So that's HKEY_LOCAHL_MACINE > SOFTWARE > Wow6432Node > Canon > EOS Utility... leave the new folders empty and go ahead and close the Registry editor...
install eos utility
Now when you run the updater application you downloaded you get a window that says 'Extracting Files' instead of the search CD window...
install eos utility
Success! It's the install window and you didn't even need the CD!
camera hooked up to laptop
Presto! Now I just need a longer USB cable that goes to my camera...