Thursday, February 26, 2015

Venus and Mars February 23, 2015

I got clouded out for the great triple conjunction of Venus, Mars, and the Moon on February 20 - but a few days later, our neighbor planets were still fairly close together in the sky. I caught them setting to the west over my neighbor's house.

I tried some different exposure settings, including high f-stop number to create a spiked lens flare around bright Venus. Chris wasn't too happy that I stepped outside to take photos right when dinner was ready, so after a few shots I came back inside for Taco Night.  :)

mars and venus over a house
Single frame, Canon T5i, ISO 1600, 105mm, f/5.6, 1.3 sec
mars and venus low horizon
Single frame, Canon T5i, ISO 1600, 135mm, f/5.6, 1.3 sec
mars and venus over house
Single frame, Canon T5i, ISO 1600, 135mm, f/5.6, 1.3 sec
venus and mars 300mm
Single frame, Canon T5i, ISO 1600, 300mm, f/7.1, 1.3 sec, this one has my favorite lens flare around Venus
venus and mars 300mm
Single frame, Canon T5i, ISO 1600, 300mm, f/11, 1.3 sec

Tuesday, February 17, 2015

Compare and Review iPhone Telescope Adapters

I'm writing this post to try to keep up with an emerging family of products offered to attach the iPhone to telescopes, microscopes, spotting scopes, and the like. Over the past 2 years I've been sort of watching these products at arms length, considering and hesitating to buy one. The problem is that these products seem to come and go within a matter of months, and it's difficult to keep track of which ones are still around, which ones are any good, and which ones people have actually tried using for iPhone astronomy and astrophotography.

It started in 2012 when the Magnifi adapter had a successful Kickstarter campaign, (although I think Orion had their first model quietly available in 2012 as well) and since then the field has exploded with a series of short lived adapters that come and go with different versions of phones. From there, universal adapters became popular just within the last year or so, in what we could call the 2.0 era of smartphone telescope adapters.

Now, I don't claim to have personal experience with all of these adapters, so this post is more of a knowledge base or a list of products that I've found out there. I also want to link to other amatuer astrophotography websites from enthusiasts who have actually used these products, or example astronomy shots that were actually taken using them.

Some things to keep in mind with digiscoping (using a camera through an eyepiece), the quality of the image is probably not due to the adapter itself - because things like technique, post-processing, and telescope quality will all likely trump the adapter's contribution. Unless the adapter is just plain bad. 

In alphabetical order:

Carson - HookUpz™ Universal

Carson - HookUpz™ Universal
Photo by Eric Teske
Similar to other optical adapter stories, Carson started out with adapter cases for specific versions of the iPhone and Samsung Galaxy. As the trend is going, the demand for a universal adapter for any smartphone resulted in the Carson Universal adapter. I personally own this adapter, and it also comes highly recommended by Matt at iAstrophotography.com.
Tutorials and Reviews using this product:

iScope - iSpotter

iScope - iSpotter
Photo from iSpotter.com

The iSpotter from ​iScope, LLC is another smartphone optics adapter that works with binoculars, telescopes, and spotting scopes. It seems like the company originally started with a rifle scope adapter with the idea that people could film their hunt or see through the scope using the iPhone as a display. They branched into the iSpotter, a version that works with spotting scopes and therefore things that are more similar to telescopes. It's an odd combination of being universal on one end, but requiring a "backplate" specific to your phone model. Nevertheless, it seems to do the trick!
Tutorials and Reviews using this product:

Orion - SteadyPix 

Orion - SteadyPix
Photo from Telescope.com

Orion has been in the smartphone telescope adapter game for a while, and had some iPhone only versions out for a while. It seems like every few months a new version would come out and the old versions would linger on Amazon. They started around $90 if I recall. The trend seems to be shifting toward universal smartphone solutions, and thankfully the price is coming down. They now have a universal smartphone adapter under $50. Andrew Symes, the preeminent iPhone astrophotographer of our day (in my opinion), uses an Orion SteadyPix for his shots.
Tutorials and Reviews using this product:

Phone Skope

Phone Skope
Photo from PhoneSkope.com

Phone Skope has a wide range of scope adapters for digiscoping and already has a big following in the hunting and outdoor sports community. Check out their Instagram page for some great examples (and the occasional moon photo). They do offer a universal option, but it's lost among the zoo of other adapters, and even the option to order custom dimensions. My prediction is that the trend toward universal adapters will take hold and we'll see a shift away from ordering based on your phone model.
Tutorials and Reviews using this product:

Snapzoom

Snapzoom
Photo from Amazon.com

Snapzoom was smart to get in with a universal adapter (also a Kickstarter baby) for any smartphone - hopefully that means it has some staying power instead of trying to re-design a new case for every possible phone. In my opinion, they are right on the money with the idea that you need to be able to shift the phone easily along the X and Y Axis to line it up to various scopes. The flexibility is good, but I've read reviews that say the tiny screws are a pain - otherwise they are right on track!
Tutorials and Reviews using this product:

Sunday, February 15, 2015

Mars and Venus Dating in February

I've heard that men are from Mars and women are from Venus, so it seemed fitting that the two planets seemed to chase each other into the sunset on Valentine's Day. The bright evening star Venus shone bright high above the horizon, but it wasn't until I got the photos onto my computer that I noticed fainter Mars to the upper left.

venus mars conjunction february
Single frame, Canon T5i, f/8, 0.8 sec, ISO 400, 50mm

venus mars february 2015

venus mars february 2015
Single frame, Canon T5i, f/8, 1.3 sec, ISO 400, 30mm

Keep an eye on the two over the next few days, as the couple will get closer together. I guess you could say the pair got together on Valentine's Day, got closer over time - finally, on February 20, the planets will have a kinky 3-way with the slim crescent moon after sunset. I doubt the 50 Shades of Grey movie includes planetary conjunctions haha!

february mars venus moon
Mars, Venus and the Moon within 2° on February 20th, screenshot from Stellarium

Saturday, February 14, 2015

Crescent Moon Rising with Saturn and Scorpio

I was up letting the dog out at 3am the other night and saw an orange crescent moon rising over the neighbor's house. Next to it, I saw two brighter stars - but when I went to take a picture of the scene I thought I was getting some crazy double lens flare or something. What were these two extra stars below it? I seriously thought it was some kind of lens anomaly.

crescent moon with scorpio
Single frame, Canon T5i, f/6.3, 2 sec, ISO 1600, 110mm

saturn in scorpio

saturn in scorpio


Then I hopped on Stellarium and saw that this group of stars was actually Saturn in the head of Scorpio. Like a little sideways big dipper with Saturn, β1 Sco (Acrab), ν Sco, ω1 Sco, ω2 Sco, and δ Sco (Dschubba).

saturn moon scorpio with labels

Friday, February 13, 2015

iPhone 6 on Carson Universal Telescope Adapter

universal iphone telescope adapter mount
iPhone 6 on Carson Universal adapter mounted onto Meade 285 refracting telescope.

It came! The Carson Universal adapter is a clever optical adapter that lets you mount almost any smartphone onto almost any optics. The iPhone 6 is a big phone, will it work? Let's see... first things first, let's savor the unboxing experience...

dog and brown packagecarson universal package front


carson universal package front

carson universal package back

carson universal unboxing
The inner white box reminds me of an Apple product

carson universal unboxing

carson carrying case
carson carrying casecarson carrying case


The case is very nice quality, and the clip on the side is handy. The adapter fits snug and has a custom foam cutout to store it securely. When I first opened the carrying case clam shell, the first thing I noticed was that the adapter was cold to the touch. The back plate is hard and sturdy, I can't tell if it's metal or not - which is weird - but it's very light yet sturdy.

carson lens spacertutorial reminder

It comes with a lens spacer in case you have optics that need to have the camera back a little further. I have an eyepiece that has a larger light cone because I can look through it without removing my glasses, so this seems perfect. There is a little piece of tape reminding you to look at the tutorial videos before you mess with it, so let's look at one now...


Ok, this is all fine and well - but how well does an iPhone 6 fit into this adapter? Let's take a look. The case on my phone is a clunky Ballistic brand case. For convenience, I first tried my phone in the Carson Universal with the case on. It technically fits, but the corners on my case are irregular shapes, not a clean square case, so it makes it more of a hassle. I think I'll just take my case off and give it a better fit.

iphone 6 volume buttons

iphone headphone jackiphone telescope adapter mount

The buttons are all un-obscured when the phone is in the adapter. Whew! Best of all, the headphone jack is exposed so I can use a volume button shutter remote.

iphone telescope adapter mountcarson universal back


iphone 6 camera and telescope mount
Hi there! The iPhone 6 camera lines up through the adapter, even though the camera for the iPhone 6 is waaaay up in the top corner of the phone. 

Now, the iPhone 6 is a huge phone - it's both long and kinda heavy, and both of these variables play into an important issue with any adapter. I'm talking about the tendency for the clamps to slip and the phone to slowly pivot out of alignment. This adapter does it better than others I've seen, but the design of the phone makes it as hard as it possibly can be to keep it aligned.

carson universal grip
A nice firm grip is important, and these 4 rubbery nubs are very tacky and grip onto the sides of the eyepiece. 
perfect alignment iphone to telescope
The Carson Universal adapter does an amazing job hanging on and keeping the camera centered over the eyepiece. But it can't stop gravity, so if you move it around too much it will eventually droop. No big deal!

iphone adapter droop on eyepiece

If you have the telescope near horizontal or 45 degrees, and then move it around too much, the weight of the phone can overcome the coefficient of friction between the nubs and the eyepiece - which causes the adapter to droop. Let me tell you, this adapter is so much better than trying to wrap paper around the eyepiece to hold things on.

It's less of an issue the closer to vertical you are, because the moment arm is smaller. That's the perpendicular distance between the force vector and the axis. In this case the force vector is pointing straight down (gravity) and the axis is the attachment point. The length of the phone doesn't change, and the weight of the phone doesn't change, so moving further away from horizontal decreases the torque at the moment arm.

torque of iphone adapter around eyepiece

carson universal adapter with iphone

Ok, thanks for checking out my unboxing post that got WAY OUT OF HAND and way too long! Next up, I just need a clear night to test this bad boy out. Check it out on Amazon.

Thursday, February 12, 2015

iPhone Night Photos with Manual Custom Exposure Camera App

New iPhone camera functionality in iOS 8 allow third party apps to open up manual exposure settings for iPhone photos. This is particularly interesting to anyone already familiar with DSLR settings, people who want full control of their exposures, and people like us (me and probably you too) who want to push certain aspects of the camera settings to continue pioneering into the realm of iPhone night sky photography and iPhone astrophotography.

I won't do as detailed an article as iPhone Photography School, so I recommend their post titled How To Use The New iOS 8 Manual Camera Controls.

I'll focus on one great app called "Manual - custom exposure camera" for now - but trust me there are more great apps on the way and I have my eye out for new useful tools all the time!


This app is simple and does the trick. The menu to change ISO can get stuck scrolling sometimes as your finger touches off the side of the scroll bar - and when the scroll bar pops up it covers up the shutter and dashboard section. But all in all it does the job and was very intuitive. I didn't have to read anything about how to use it to just dive right in.

You'll notice below that the Manual app only goes up to ISO 1600 where even the default iPhone camera chose to push the ISO even higher, but the default camera didn't compensate with longer shutter so the final image is much darker.

manual iphone camera exposure
iPhone, handheld, Manual app, f/2.2, 1/2 sec, ISO 1600, 4mm

bad iphone night shot
iPhone, handheld, default camera, f/2.2, 1/15 sec, ISO 2000, 4mm
Pretty huge right? Even handheld the 1/2 sec exposure was manageable and clearly lets in more light than the 1/15 sec shutter the default camera app chose for me. Now let's go for some stars...

bad iphone night shot
iPhone, handheld, default camera, f/2.2, 1/15 sec, ISO 2000, 4mm

manual iphone camera exposure
iPhone, handheld, Manual app, f/2.2, 1/2 sec, ISO 1600, 4mm
I also ordered a Carson Universal that should be here tomorrow! I can't wait to try out manual iPhone camera settings on the moon, Jupiter, and maybe even Orion Nebula. I'm excited! Check out Matt's post about the Carson Universal over at iAstrophotography.com. Clear skies!

Sunday, February 1, 2015

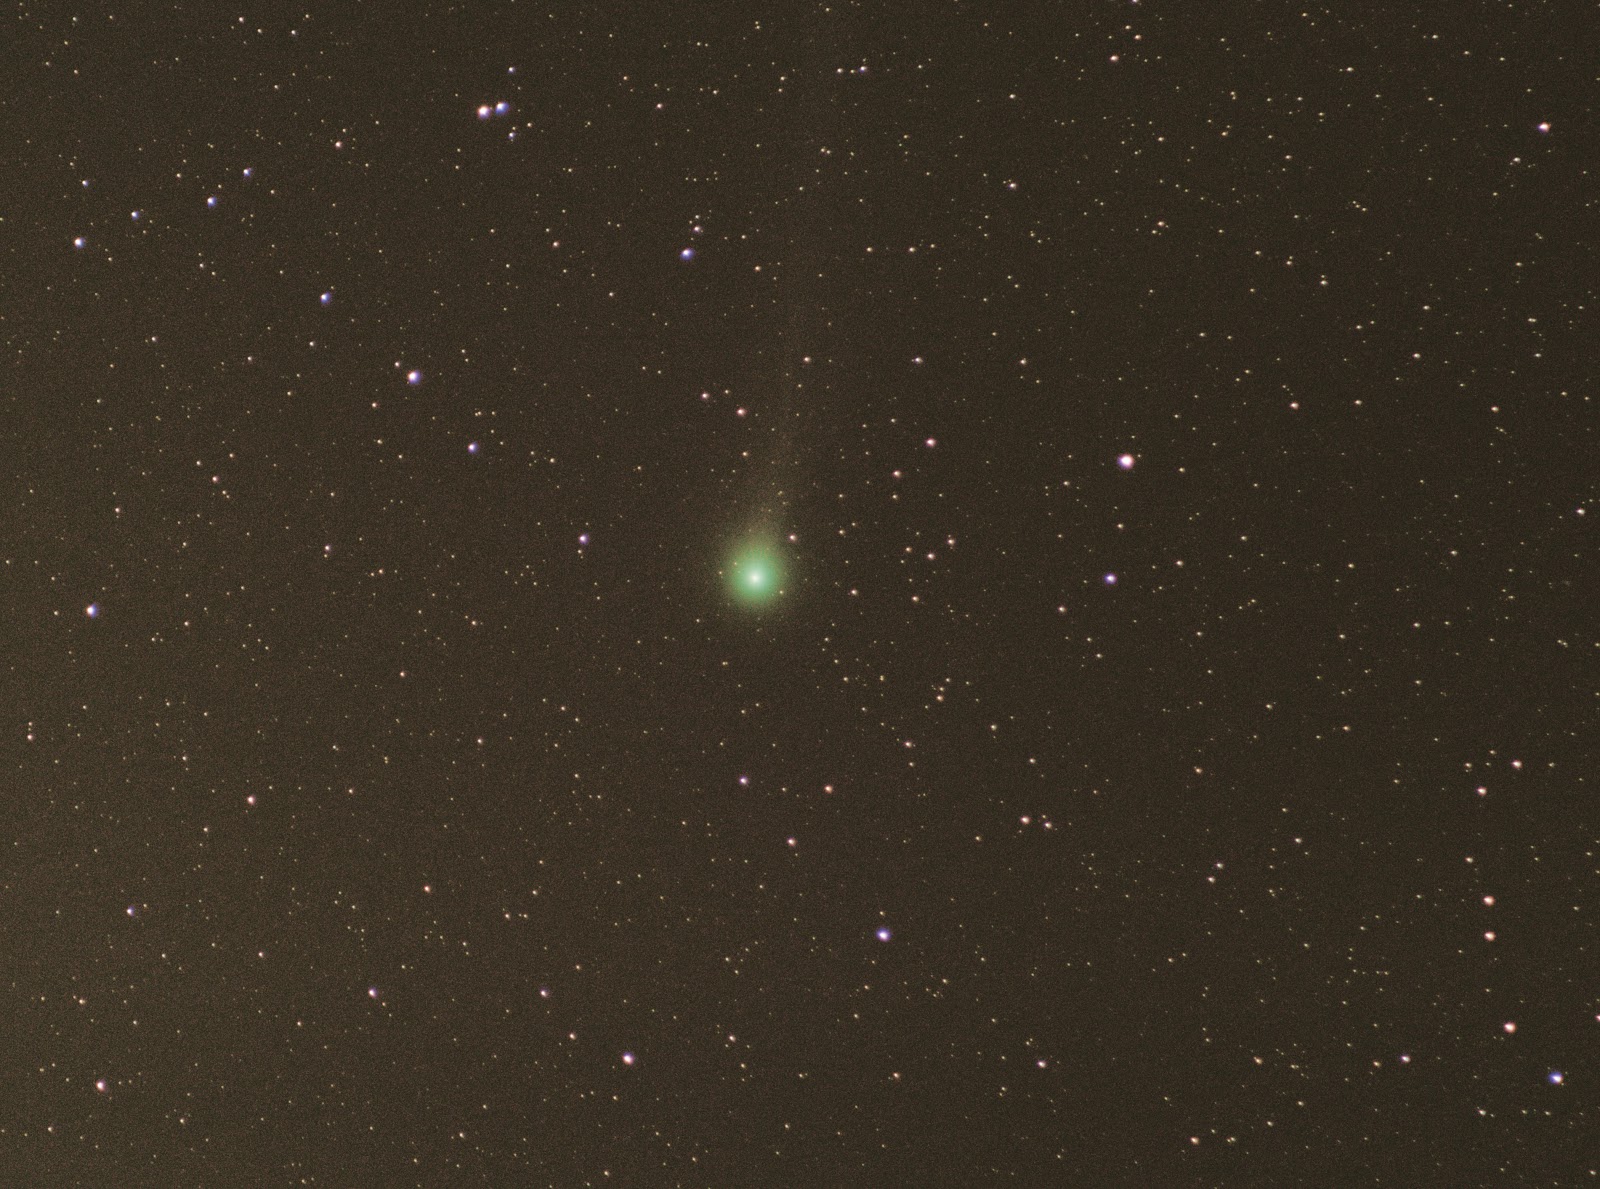
Comet Lovejoy (C/2014 Q2) with DSLR on Motor EQ-1 Mount

I'm getting better at polar-aligning my motor driven EQ-1 mount, and increasing the total exposure length I can achieve without star trails. However, now I'm running up against another barrier - I'm getting to the point where my sky conditions have too much light pollution to even merit longer exposures.

long exposure without star trails DSLR
My longest single frame without star trails (left) straight from the camera. I love the aqua color of the comet without any processing! Stacking always seems to make it a dull green.
ISO 1600, 300mm, f/5.6, 20 seconds, Canon T5i on motor driven EQ-1.

With the sky beginning to wash out even after 20 seconds, you can tell that my techniques are advancing up against another ceiling, the sky conditions themselves. Even if I did have a super fancy tracking mount, would it even be worth it if I can only get exposures of 20 seconds?

comet lovejoy DSLR 300mm
Comet Lovejoy C/2014 Q2 with Canon T5i on EQ-1 mount
Stack of 31 light (ISO 1600, 300mm, f/5.6, 13 sec), 21 dark, 23 bias, and 15 flat frames
Processed in DSS

comet lovejoy DSLR 300mm
Comet Lovejoy C/2014 Q2 with Canon T5i on EQ-1 mount
Stack of 31 light (ISO 1600, 300mm, f/5.6, 13 sec), 21 dark, 23 bias, and 15 flat frames
Processed with layers from both DSS and Photoshop

And yes, I'm using flat frames like a good boy! Every time I learn something new it seems to make my imaging procedures longer not shorter! Flats make a big difference though, it's like the "eating your vegetables" of astrophotography. I used the same technique I talked about in this previous post.

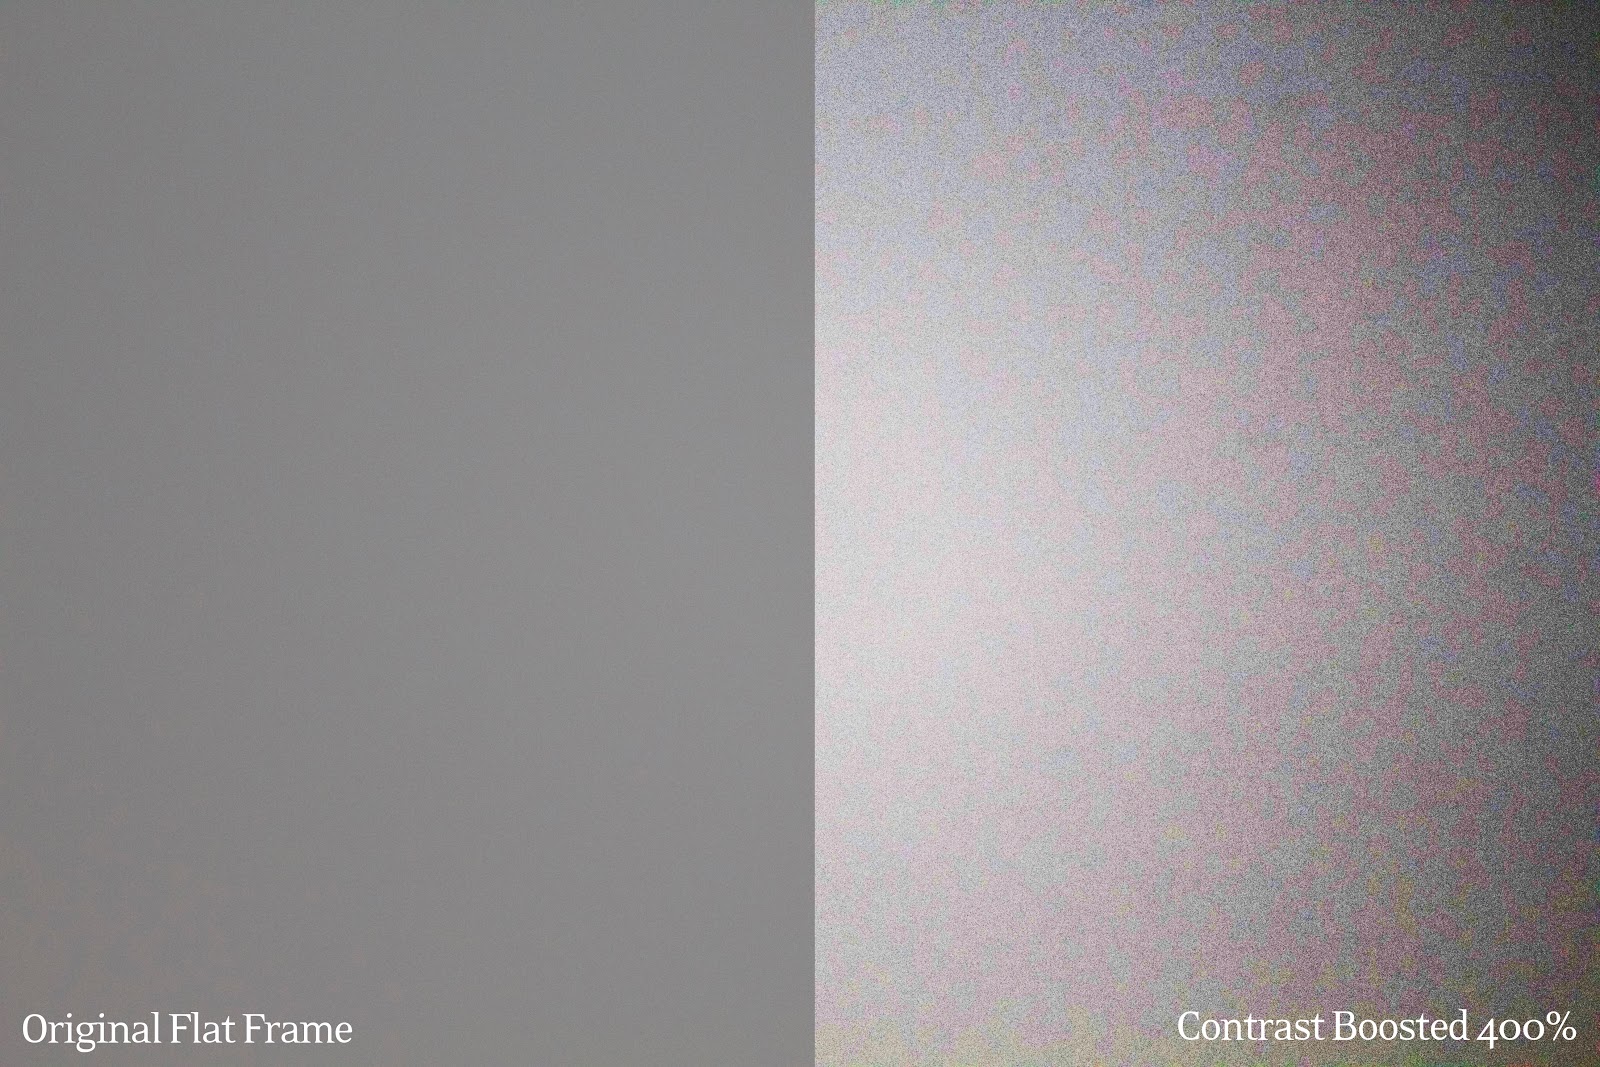
Flats should be gray, not white. Below is a sample of one of the flat frames (left) and that same frame with the contrast turned WAY up (right) to show that there really is some gradient and vignette information there even though to the naked eye it just looks like an even gray wash. The purpose being that the image processor, such as Deep Sky Stacker, will remove the hot spot gradients and corner vignettes.

flat frame compare with contrast gradient
One of my flat frames with contrast boosted on one side to show gradient information hidden within. Adjust exposure time until you get a good histogram just to the left of center. This one happens to be ISO 1600, 300mm, f/5.6, 1/640 seconds.

take flat frames with computer screen
Taking flat frames with DSLR - I actually took them hand-held as close to the screen as possible while moving the camera around to make sure I didn't get a dust spot in the same place each time.