Thursday, December 29, 2016

First Glimpse of Flame Nebula, Adding Data to Orion (M42) and Running Man

My favorite astro image I've created so far would have to be my 2014 image of the Orion Nebula that was lightyears ahead of my previous attempts thanks to my motorized EQ-1 mount and a little practice. I don't do a lot of deep sky images, but when I do I try to go all out and get the best image I can with the gear that I have. That image from 2014 was only 159 subs at 13 sec each for a total exposure time under 30 minutes. This year, I wanted to take another shot at Orion and add some frames to my stack to see if I could get an even better image. I was able to double my frames before the camera frosted up, but the end result isn't all that different.

orion nebula image process
Progression of image processing, (1) single frame, (2) stacked processed photo, and (3) slightly blown out contrast and structure with Instagram edits

I started by doing some reading about polar alignment, and started second-guessing my procedures for trying to get aligned. I've been assuming the division in the concrete patio followed a north-south line because I assume my house faces north - but that may not be precise enough. I got my compass app out (I don't have a 'real' compass) and tried to see where true north is exactly. With the app, it's a little sticky and doesn't exactly scream precision. Nevertheless, it was enough of a difference to convince me that the concrete line shouldn't be my guide.

orion nebula 300mm
Final product, Canon T5i on EQ-1 motorized mount, 300mm, ISO 1600, f/5.6, 13 sec, combining 159 subs from 2014 session with 159 subs from last night 20161228, 20 darks, 20 bias, 10 flats + previous darks, bias, and flats, total exposure time less than 1 hour.

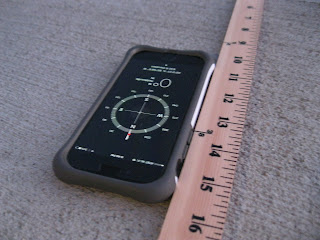
I took out a yard stick and a washable marker and traced a line for north. Then I moved the phone around and the compass moved slightly (ugh). So I traced this new line as well. I took the average of the two and considered it my true north. From the pictures you can tell it's slightly off from the concrete line. The concrete line is about 5ยบ off from compass north.

iphone compass and yard stick

iphone compass and yard stick

marking north on concrete

After taking the light frames, I took some calibration frames. I even took flat frames, which is the photography equivalent of eating your vegetables. I still get a kick out of how dorky the camera looks starring at a blank white screen. A few years ago I would never associate these kinds of steps with better night sky photos - I figured they were all straight out of the camera with mystical amazing gear.

flat frames with laptop screen
Using a computer screen with PowerPoint on a blank slide to create a light panel for flat frames

When I get the images out of DeepSkyStacker (DSS) they look something like this (below), and this is actually after I do some basic curve adjustments in DSS and then transport the image over to Photoshop to continue cleaning it up.

mosaic deep sky stack
Orion nebula stack straight out of DSS before going into Photoshop
So all in all it was an okay night to add some frames to my Orion stack, but I think I need to get over the hour mark (and ideally to 3 hours of exposure) to really see the difference in clarity. It's still grainy and still faint.

Speaking of faint, while I was getting my camera set up I was messing around to see what I could see and how long I could get my exposure without star trails. My EQ-1 motor is inconsistent but every now and then you get something cool. I was able to get about a 25 sec exposure of the Flame Nebula and saw it in my camera for the first time ever. I reduced my exposure down to 15 sec to take a quick stack (knowing my real target for the night was M42). I took 13 frames, 10 were usable, and ended up with something like this after stacking only subs no calibration frames.

flame nebula
Stack of 10 frames each at ISO 1600, 300mm, f/5.6, 15 sec
Curse you gray hot spot in the center! I stacked the images again using my calibration frames from the Orion stack, even though they don't quite match up. I came out with an orange grainy blob, but to my surprise and delight you can barely make out the Horsehead Nebula as well. Unless my eyes are just playing a trick on me.


If you use an HDR effect, my favorite happens to be Instagram's 'structure' edit feature, I know it makes it way too grainy and resizes the image, but I haven't figured out how to replicate it in Photoshop, and if you squint your eyes it really helps bring the Horsehead Nebula out. Proof! Not exactly a glamor shot, but you can tell there is a structure there. Can you see it?

horsehead nebula
Instagram HDR 'structure' edits exported to Photoshop to add dashed stroke path
I think I'm even more excited about the Flame Nebula first sighting than I am about messing with M42 again.

Wednesday, December 28, 2016

New Gear: DigitalMate 500mm/1000mm f/8 Manual Telephoto Lens

DigitalMate 500mm telephoto lens
DigitalMate 500mm telephoto lens for Canon, 2x converter (1000mm), f/8 manual telephoto lens

I got this DigitalMate 500mm (1000mm with 2x converter) f/8 manual telephoto lens for Christmas and I'm keen to try out the impressive 1000mm reach on some night sky objects. With an aperture range of f/8 to f/32, this is going to be extremely useful for lunar, planetary, and solar observing. It could be useful for double and triple stars as well, but maybe not so great for faint deep sky objects. I can't wait to try it out at night to see how it compares to my Meade 285 refractor, not just in focal length but also the quality of the glass to hopefully cut down on chromatic aberration.

Be careful with your terminology, it would be a photography faux pas to call this a 'zoom' lens because the focal length is fixed. It's either 500mm or 1000mm with the converter, but nothing in between.


Here is a closer look and some 'unboxing' type photos showing off my new toy, including some close ups of the important features, and down below are my first test shots.

huge lens on camera

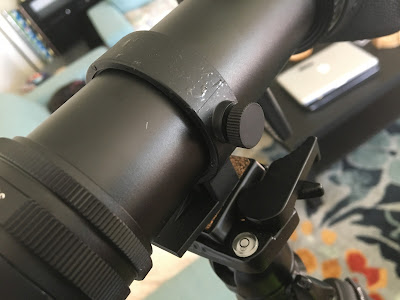
The lens is so long that it comes with a bracket to mount the lens itself on a tripod to counter balance the weight of the camera body. Although the lens is quite long and heavier than other lenses, with the 2x converter, the length is off balance and I haven't found a way to slide the ring up any further - I only manage to twist it about.

lens collar thumb screw
Close up of the thumb screw and collar attachment for the main shaft of the lens
On the top of the lens, you see what looks like focal length zoom adjustments, but remember this is a fixed focal length, so these settings are the manual focus notches showing the distance your subject should be at to be in focus.

manual focus settings
Manual focus and manual f/number controls
My kit came with a t-ring, this connects the regular Canon EF lens threads to the shaft of the lens with a narrower thread. It's a simple go-between so the lens makers can make different size t-rings to fit the same lens on different cameras without re-designing the lens itself. A t-ring is also how I attach my DSLR to my telescope.

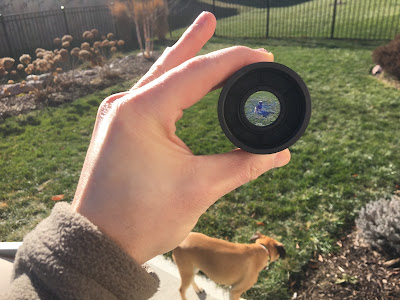
Let's take a look at that 2x converter. It looks like an eyepiece at first, but it's threaded to screw on between the lens and the t-ring. I think these things are sometimes called extenders because they literally extend the length of the lens tube and then angle it through another lens before it gets to the camera sensor (just like an eye piece).

2x converter
2x converter contains a small lens sorta like an eyepiece

camera body and converter
Camera body and 2x converter
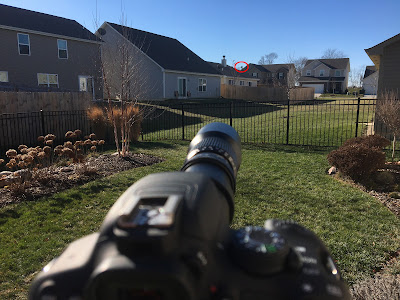
Ok, so let's test it out. First of all, when I finally got the thing on a tripod it was difficult to aim and focus. I felt like I was wielding a water canon or some kind of turret gun, and reaching to near the end of the lens to manually focus was a little clunky. For the sake of the test shots, I made it work and did my best to focus - but in the future, I think this is the kind of thing that needs to go on a mount and not just a tripod.

1000mm lens distant target
Target (below) circled in red in this iPhone photo for comparison

500mm vs. 1000mm lens
500mm vs. 1000mm telephoto lens

However, the 2x converter certainly does the trick, and the extra reach of the 1000mm focal length is impressive. Adding the converter completely changes the exposure, so I haven't figured out the 1:1 settings just yet. Do you recognize the top of the grain elevator from my moon set or sunset photos? It's one of my favorite backyard targets because it's actually a ways off across the street from the housing division but just visible between the roofline.

Here's the DigitalMate 500mm with 2x converter on my EQ-1 mount - it's a little more stable. I was making a go at Venus in the early night sky. It certainly feels more like a telescope than a lens!

digitalmate on eq-1 mount

Saturday, December 24, 2016

iOS 10.2 New Emoji Moon Detail, Astronauts, and Comet Replaced with Fireball

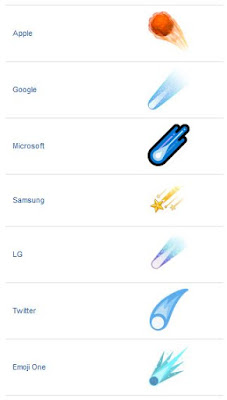
The new emoji pack in iOS 10.2 update added a lot of detail to the emojis that we all know and love. Some of the key science or space themed updates include new occupation emojis for male and female astronauts, terminator texture detail on the moon phases (big improvement), and an interesting choice to turn the beautiful blue comet emoji into a raging fireball. In fact, I think the comet emoji looks more like a meteor and it's flying up instead of pointing down for some reason.

ios 10.2 comet and moon emoji
Big changes to the comet emoji, and look at the difference a little detail on the moon phases makes! What do you think of the iOS 10.2 emoji updates?
The astronaut emoji are pretty cool! Both male and female options in the iOS 10.2 updates
Doing a little digging, it looks like the comet emoji is one of the original emoji dating back to Unicode 1.1 in 1993, whereas "female astronaut" is a new concept previously represented by 2 symbols "woman" and "rocketship" - fascinating! You can read more about who controls emoji, and the official process for submitting new emoji ideas.

various comet emoji
Various comet emoji from http://emojipedia.org/comet/
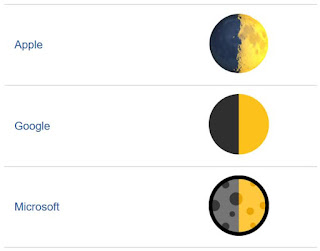
Check out the major noticeable difference in the amount of detail in this first quarter moon emoji between Apple and Google. Very cool! I think they even went a little overboard on the detail along the terminator probably to emphasize it based on the small size of the emoji character.

moon emoji detail
Various first quarter moon emoji from http://emojipedia.org/first-quarter-moon-symbol/

Wednesday, December 7, 2016

Venus, Mars, and Crescent Moon December 5, 2016

These cool nights are nice but not quite clear enough for some deep sky photography. Since I'm limited by gear, I'm very picky about my nights - if it's going to be the one time I go out all winter it better be good! So in the meantime, I have been doing some quick captures. Here I made the most of the alignment of Venus, Mars, and the crescent moon.

The thin clouds and contrails made Venus look larger than normal, and by increasing the f-number I was able to add an interesting lens flare around the moon. It looks like an eerie sun in a dark sky. The same principle works for taking photos of Christmas lights, you can really make them pop by adding tiny lens flares around each one. You just have to increase the exposure time to let in more light, and keep the ISO low to reduce noise.

mars venus and crescent moon long exposure
Single frame Canon T5i ISO 800, 33mm, f/7.1, 6 sec lightened in Photoshop
Here's a closer look with Mars sneaking behind the branches of my favorite river birch trees in the backyard. Venus looks huge in the haze.

moon and stars long exposure
Single frame Canon T5i ISO 800, 38mm, f/7.1, 6 sec lightened in Photoshop
Contrails over the moon for a hazy look, pulled back to get a little more foreground. Not much you can do with the foreground composition here in the backyard.

haze over moon f/8
Single frame Canon T5i, ISO 800, 22mm, f/8, 20 sec lightened in Photoshop

moon and stars with small tree
Single frame Canon T5i, ISO 800, 22mm, f/9, 20 sec with porch light on

moon and venus stack
Stack of about 88 frames each at ISO 800, 22mm, f/9, 20 sec
I guess this is one of my only star trail photos with the moon in it. It's kinda neat, I normally exclude it and just focus on the stars. Just for overkill here is a timelapse of the stack: