Wednesday, July 31, 2013

Clean Dust from Canon Rebel XT Image Sensor


Urgh! If only someone had told me it was this easy to clean the dust off my image sensor I would have done it months ago! I bought a blower thing and I've been trying and trying to get the dust out, but nothing seemed to work. I figured I would have to pay to get it professionally cleaned or just deal with little squiggles on the edge of all my photos. I never knew my camera had a "sensor cleaning" mode that moves the mirror out of the way so my blower can get to work!

canon rebel xt image sensor dust
I got so used to having this dust here, I practically gave them names
canon rebel xt mirror
When you take the lens off, you notice the mirror is in the way of cleaning...
cleaning canon rebel xt
So duh, there's a mode for cleaning that locks the mirror up... I mean... I knew that
cleaning canon rebel xt

canon rebel xt image sensor
Now the mirror is out of the way. Don't breathe! Be careful! Use the blower!
Point the camera hole down and the blower up so gravity helps the dust drop out.
canon rebel xt clean mode
The camera will be in Clean mode until you turn it off.
No more dust! Thank jeebus!

Sunset Reveals Dust on My Image Sensor

I've had these two trouble spots for about 6 months now, probably dating back to when I changed lenses in the middle of a windy field. I can't tell if they are on the lens or the image sensor. Is there a way to tell just by looking at the image? I bought a rubber blower thing but I can't seem to get rid of these little pieces of debris!


Update: Success!!!! Duh

Sunday, July 28, 2013

Neptune in Aquarius

My first ever shot of Neptune! Neptune was the first planet found by mathematical prediction rather than by empirical observation, and wasn't directly observed until 1846! Took these photos last night at around 5:30am ET over the western horizon.

aquarius constellation with star labels
35 subs, 12 darks, 12 bias frames each at ISO 1600, 35mm, 8 sec, f/4.5

neptune canon rebel xt
Cropped from 35mm image above

The "Coathanger" and Northern Cross Asterisms

I saw a post from Astro Bob about The "Coathanger" asterism, and I immediately went back to check my Northern Cross photos to see if they included this fun little group of stars. Indeed they did! Here is a Northern Cross photo I made last night at about 5:30am ET.

Update: Take a closer look at the Coathanger Asterism

northern cross with star labels
34 subs, 12 darks, 25 bias frames each at 28mm, ISO 1600, f/4.5, 13 sec

Conjunction of Jupiter, Mars, and Mercury on July 28, 2013

I went outside to check to see if the conjunction was visible, and I was able to spot all 3 planets rising above the apartment complex. I went back inside to get my camera, and when I came out the light was a little less optimal (too bright), but I was able to capture all 3 planets in the frame. I adjusted the contrast a bit in Photoshop to compensate for the brighter sky.

Morning conjunction 30 min before sunrise

August 3, 2013: Crescent moon will join morning conjunction of Jupiter, Mars, and Mercury

I don't usually post predictions on this blog (for that, I use things like SkyWeek Plus and NASA JPL What's Up videos), but I happened to stumble across this conjunction while I was planning my shots this morning.

Saturday morning, August 3, 2013 at 6:00am (Indiana), screenshot from Stellarium


Sunday morning, August 4, 2013 at 6:00am (Indiana), screenshot from Stellarium

Look to the East about 30 minutes before sunrise to see the crescent moon (5.6% illuminated) join a conjunction of 3 planets: Jupiter (top), Mars, and Mercury (bottom). The objects will be between 20° and 6° above the horizon (Hint: One fist width at arms length is about 10°).

Saturday, July 27, 2013

Light Painting is Hard

Light painting is harder than it looks. I went out last weekend with my friend Drew to do some light painting with my Canon Rebel XT and shutter remote. I left my shutter lock on with the idea that I would just stack some of the photos later to create more elaborate light trail and light painting scenes (more than I could do in 20 seconds during a single exposure).

I learned a lot along the way, here are the most important lessons that I came away with:

1. Light painting is very different from star trail photography. With star trails, you want to get to a very very dark location to get as many stars as possible. With light painting, you don't want to be in pitch black - because then you might as well be standing in a bathroom with the door closed. With light painting there is a greater need for context and some kind of subject matter. The light trails should enhance the scene - but they are not the entire scene in themselves.

light trail with canon rebel xt
Lighting the ground saved this shot because without it the lights appear to be floating in a boring black void.

2. As cool and 3D as the light trail might look at times, to the camera the light is completely 2D. This means that it's very difficult to show depth - such as running down a wooded path at night. The camera doesn't know you're going down a path into the distance, it just sees the light with very little vertical and lateral movement. Essentially, the light trail looks 2D and showing depth takes extra effort (and in my case luck).

rainbow circle light trail
Rainbow light tunnel (with legs)

3. Less is more. Unless you are going to fill the entire frame with abstract colored lights, the best shots I came away with included accents and effects that make the photo more interesting. But again, don't think about it as painting the subject matter, but enhancing the subject matter with interesting light paintings.

light trails on bridge
Light bridge with faces

4. Drawing is hard, drawing with invisible paint in a 3D environment is even harder. I came away with a stick figure drawing that was actually rather successful (as far as stick figures go) because it is very difficult to connect lines, write words, etc. Your light will leave a path in the camera, but not in the air - so connecting lines, drawing circles, and making lines overlap is very tricky.

light painting figures
Stick figure light painting

Friday, July 26, 2013

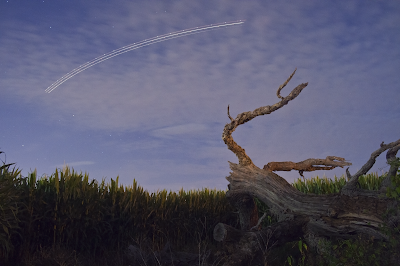
Star Trails with a Dead Tree in a Corn Field

I've been wanting to shoot this dead tree since I moved in. It's about 100 feet off the side of a 5 lane highway. Now that the corn is tall enough, the tree sits in sort of a horseshoe-shaped clearing that blocks most of the headlights from traffic, and also lets me hide from passing cars.

The tree sits far enough back that I felt comfortable leaving both my cameras out there for about an hour and a half. Unfortunately clouds rolled in after about an hour. This scene is definitely the next step in my star trail development because it has actual subject matter! I'll definitely be back for more.

dead tree star trails

dead tree star trails

dead tree and night sky

dead tree and night sky


Thursday, July 25, 2013

iPhone Star Trails and Guest Post

I made this image of star trails facing north using photos taken with my iPhone 5 and the techniques described in my guest post "How To Take Night Sky Photos With The iPhone" for the iPhone Photography School. Check it out!

275 images stacked in StarStaX, ISO 3200, 1 sec each, 18 sec apart

Wednesday, July 24, 2013

Most Detailed iPhone Photo of the Moon Possible

I pulled out all the stops on this one, and I'm calling this the best iPhone moon photo possible. If you're into a challenge, follow along with the steps below! It's kind of fun to test creative ways to improve the image quality with a limited quality camera. If you don't like pixelated blobs, just use a real camera and take some better moon photos.

Update 12/26/2015: Here is some great surface detail with just a single frame iPhone photo and no additional lenses. 

detailed iphone moon photo
Drum roll... here it is... the most detailed iPhone photo of the moon possible (without additional lenses). Looks kind of like a ying-yang symbol. These are the original pixels.
best iphone moon photo
This is the same image blown up in Photoshop - which averages out the pixels to estimate what they would look like resized. I like this one better, but I included the original pixel version so you know what the "actual" image looks like.


compare iphone moon photo
Stacking helped to clean up any color and distortion from noise. Large structures are clearly visible compared to a DSLR photo for reference.

Here's what I did:
  • Set the Night Cap app to take TIFF images (no compression) to cut down on any distortion from file compression.
  • Held my iPhone up to a light and locked the exposure on ISO 50, 1/1938 sec.
  • Put my iPhone on a small tripod using the Glif tripod mount.
  • Manually took 20 back to back photos of the moon.
  • Loaded the photos into a free software package called Registax that is designed to reduce noise by stacking images of the moon and planets.
  • Aligned and stacked my 20 TIFF files into 1 file, then adjusted wavelets. 
The final image shows the 96% full moon with a 29 pixel diameter. 400% zoom in Photoshop makes the circle a little pixelated, but large enough to compare to the DSLR photo. You can see that even the pixelated circle shows large structures on the moon, such as the difference between dark and light spots (the dark spots are lunar maria, or "seas"), and even a brighter spot corresponding to the Tycho crater.

Here are some screenshots showing my process:

nightcap camera app screen shot
Focusing on the moon using Night Cap camera app

iPhone photo in registax
Making adjustments to the iPhone photos in Registax

Registax software screenshot
Using Registax to align a "regular" image of the moon taken with a DSLR camera and 300mm zoom lens

Tuesday, July 23, 2013

Interesting iPhone Light Trails with a Glitter Wand

I recently went out on an excursion to take some light trail photos with my friend Drew (post coming soon). We spent several hours in the woods, and I learned a lot about DSLR light trails. I wanted to try something new with my iPhone, so I set it up on my balcony at sunset. I used Slow Shutter Cam () and busted out the light up glitter wand I bought to make interesting rainbow light trails.

Light trail with Slow Shutter Cam app and glitter wand taken with iPhone 5


Against the bright evening sky, the wand is pretty much invisible (sometimes just a little washed out). The light doesn't show up too much, but the glitter provides an interesting effect. The rays of light that you see in the photos are actually not from the wand but from the sun bending through the clear plastic cylinder.

Behind the scenes look at my set up.. It wasn't planned out much, more of a happy accident
Another example, I went a little slower and the white wand is more visible

Contrast isn't quite as good in this one, but nice effect

Let's not get crazy now!

Friday, July 19, 2013

Globular Cluster M53 Consolation Prize

I made another honest attempt to locate the Black-eye Galaxy with no success. I think the darn thing is just too faint. I did, however, locate globular cluster M53 while star-hopping between Arcturus and Vindemiatrix (ε Vir). After my eyes adjusted a bit I was able to see Diadem (α Com) just below M53, which served as a good anchor point. 

64 subs and 34 darks, each at ISO 1600, 1.3 sec, f/5.6, 300mm (zoom crop)
Astrometry.net verifies my ID, notice Î± Com chillin down there
I was standing hunched underneath my camera for about 20 minutes just scanning back and forth, star hopping, and trying to spot some kind of fuzzy dot. It was super humid and I was smelling something awful by the time I decided to just settle for M53 and take a quick stack.

Monday, July 15, 2013

Accidental M3 Globular Cluster

I thought I was shooting M64 the Black-eye Galaxy in more detail after spotting it in a wider shot the night before (see previous post). I focused my 300mm lens on the moon, and then just started scanning the sky at ISO 1600 for 8 sec looking for a fuzzy blob. When I found one in the general area I was looking for, I figured it must be M64 - but I was wrong. I was actually about 15 degrees above M64 looking at M3 a globular cluster.

I mean, hey I'll take it! This explains why my "galaxy" wasn't processing well in Deep Sky Stacker - it just looked like a little ball. No wonder, it is a cluster not a galaxy! I didn't figure it out until I had Astrometry.net label my image. Now I have to wait for another clear night to try for M64 again.

m3 globular cluster
95 subs, 30 darks, each at ISO 1600, 1.3 sec, f/5.6, 300mm

m3 globular cluster
Single exposure at ISO 1600 for 8 sec to help me locate the fuzzy glob

Wouldn't have known it was M3 without Astrometry.net labeling my photo for me

Sunday, July 14, 2013

Coma Berenices with Star Labels over Indiana

This is my first attempt at stacking star fields using Deep Sky Stacker since moving to the Indianapolis suburbs. It's been a while since I tried stacking faint objects like this, and I have a host of new targets in the summer sky. Facing west off my balcony, I tried to locate a clump of objects below Coma Berenices because it looked like a fairly busy piece of sky (and there is light pollution to the south blocking my views of the Milky Way and all its jewels).

I stacked 67 light frames and 18 dark frames, and uploaded the results to nova.astrometry.net to help me label and identify interesting objects (green), then I identified the objects that were too faint for the system to pick up (white).

Coma Berenices
Each sub (light frame) was taken at 75mm, f/4.5, 4 sec, ISO 1600
Since this was only zoomed in to 75mm, I'll have to try again to take designated shots of M64 and M100. I don't think I can check them off my Messier object checklist until I get a little more detail. It looks promising that I can even make out a faint blob at 75mm with only 67 subs!

Cut the Cord: Designated iPhone Remote Shutter Release Cable

I got this one straight from The iPhone Photography School. It's super simple. I already use my iPhone headphones with volume controls as a remote shutter release cable. Since I seem to have a bunch of extra Apple headphones, it wasn't much of a sacrifice to cut the cord and remove the extra headphone parts - leaving the volume buttons behind.

It makes me feel like I have a special photography tool in my kit, and not just a random pair of headphones. It's a great addition to my slapdash photo kit. Thanks iPhone Photography School!

iphone headphone remote shutter release

P.S. This is my 200th post, what up!!!

Apartment Balcony Star Trails, Where to Next?

Here are a couple more typical star trail photos from my balcony. I think after this I'm going to start venturing out because I'm getting a little bored of the same scenery. It's just so easy to leave my point and shoot camera out overnight while I'm asleep! My next location might be a local park that I found out is open until 11pm. Most parks close an hour after sunset, so these late hours are perfect for a couple night sky pics before bed!

266 images stacked in StarStaX, ISO 800, 15 sec each

266 images stacked, ISO 800, 15 sec each. Notice the spider web on the gutter!

271 images stacked, each ISO 800, 15 sec


My next location a few blocks down the road, open late!

Thursday, July 11, 2013

July 11, 2013 Crescent Moon with Venus

Here are my best shots from my balcony tonight. The crescent moon and Venus set a little after sunset, but I was able to get a few pics on what feels like the first clear night in weeks!

moon with venus
37mm, 3.2 sec, ISO 100

wide angle moon with venus
18mm, 1.3 sec, ISO 100


Monday, July 8, 2013

Busy sky: Light trails and fireworks over Brownsburg

I made this image on July 3, 2013 from my balcony in Brownsburg, Indiana. People were setting fireworks off in the surrounding neighborhoods, and plenty of flights were coming and going for the long holiday weekend. 

star trails over indiana
405 images stacked in StarStaX, each ISO 400, f/4.5, 18mm, 20 sec
When I got back from visiting my family in Dayton for the 4th, I took a couple more from my balcony to capitalize on the somewhat visible skies (fairly hazy really, but at least it stopped raining for the first time in like 9 days).

star trails over indiana

star trails over indiana
192 images, ISO 800, 15 sec each, point and shoot camera