Showing posts with label iPhone. Show all posts

Saturday, December 24, 2016

iOS 10.2 New Emoji Moon Detail, Astronauts, and Comet Replaced with Fireball

The new emoji pack in iOS 10.2 update added a lot of detail to the emojis that we all know and love. Some of the key science or space themed updates include new occupation emojis for male and female astronauts, terminator texture detail on the moon phases (big improvement), and an interesting choice to turn the beautiful blue comet emoji into a raging fireball. In fact, I think the comet emoji looks more like a meteor and it's flying up instead of pointing down for some reason.

ios 10.2 comet and moon emoji
Big changes to the comet emoji, and look at the difference a little detail on the moon phases makes! What do you think of the iOS 10.2 emoji updates?
The astronaut emoji are pretty cool! Both male and female options in the iOS 10.2 updates
Doing a little digging, it looks like the comet emoji is one of the original emoji dating back to Unicode 1.1 in 1993, whereas "female astronaut" is a new concept previously represented by 2 symbols "woman" and "rocketship" - fascinating! You can read more about who controls emoji, and the official process for submitting new emoji ideas.

various comet emoji
Various comet emoji from http://emojipedia.org/comet/
Check out the major noticeable difference in the amount of detail in this first quarter moon emoji between Apple and Google. Very cool! I think they even went a little overboard on the detail along the terminator probably to emphasize it based on the small size of the emoji character.

moon emoji detail
Various first quarter moon emoji from http://emojipedia.org/first-quarter-moon-symbol/

Tuesday, September 13, 2016

New iPhone Red Screen Tint in iOS 10 to Preserve Night Vision

This new iOS 10 feature lets you filter your iPhone screen with different color tints. A red tint throughout the entire phone is a quick trick for astronomy and stargazing to preserve dark vision. Previously, individual astronomy and stargazing apps would let you tint the screen red for night mode, but now you can change the tint of the entire phone with a red filter using accessibility features that are brand new in the latest iOS update.

ios 10 iphone color filter to preserve night vision for astronomy
Red color tint accessibility feature in iOS 10

I'd love to show you a screenshot of the new feature, but it's actually a color overlay so the screenshots show up the original colors. This makes sense, because that's the only way it could work across all different apps without adjusting each individual app features. This also means that it's not necessarily optimized for all of the apps you might use, but it's a quick and dirty trick to make everything tinted red.

Go to General > Accessibility > Display Accommodations > Color Filters > Color Tint

ios 10 accessibility features
General: Accessibility: Display Accommodations

ios 10 color filters
Display Accommodations: Color Filters

ios 10 color tint
Color Filters: Color Tint: Hue all the way to the right: Intensity all the way to the right

Similar apps are available for Android devices, but like I said iOS apps were limited to the ones that already included a 'night mode' such as StarWalk.

star walk app in night mode
Night Mode was already available within certain apps, such as StarWalk.

Previously, iPhone users would get an evil glare if they pulled out their phone during a star party, camping trip, or meteor shower - even with the brightness turned all the way down, when your eyes are dilated the screen still appears rather bright. I'd suggest turning the brightness down AND tinting everything red just in case.

Items that were previously red might disappear completely!

You can see that it is a quick and dirty option and can actually make items disappear if they are normally red, like all the little badge icons. Oh well! Neat trick, I'll have to try it out sometime. The nice thing is that it lets you use red filter through the entire phone and not just in some apps. I know sometimes it's nice to just whip out the calculator or something while I'm observing, which involves leaving the apps that have red modes built in. 

Shout out to xt8dob on Instagram for tipping me off to this new trick!

Saturday, July 23, 2016

Full Moon Rising over Washington Monument

I've traveled to Washington DC four times this year for work, and I never thought I'd be doing this much traveling in my job in student affairs! I was in DC again this past week and decided to do some sight-seeing while grabbing dinner. I got a sushi burrito and water and walked over to the Washington Monument to enjoy the view as the sun set.

full moon washington monument


I knew the moon was getting fuller by the day, but I didn't realize it was the night of the full moon until I saw a bright orange sliver peeking over the clouds. Everyone around me stopped playing Pokemon GO for a minute to enjoy the bizarre and familiar sight.

Since the monument is positioned on a hill, there were plenty of great angles to view the moon juxtaposed alongside the flags and monument - but I didn't have my 'real' camera with me, so I was only able to grab this iPhone photo.

I reclined on the marble benches around the base of the monument and slowly watched the sky change colors and a few stars and planets slowly appear.

washington monument iphone

looking up at washington monument with hand

looking up at washington monument

Sunday, January 31, 2016

Quick Winter Sky iPhone Photo

The iPhone can indeed do wide field night sky photos, like this one of the popular stretch of sky from Sirius to the Pleiades. The stars are slightly out of focus, which actually makes them look larger and easier to see - so it's not a bad effect. This photo was taken with NightCap Pro using long exposure mode. Doing a 1/2 second exposure helps reduce the background noise because I believe NightCap is averaging the pixels to clean it up a bit.

iphone 6 star photos

iphone 6 star photos
iPhone photo f/2.2, 1/2 sec, ISO 4000, 4mm

Sunday, January 24, 2016

How to Bulk Delete iPhone Photos: Hundreds or All Photos at Once

There is a new and better way to delete all the photos from your iPhone at once, or just choose hundreds or thousands at once without wiping them all out. You can do it all from within the iPhone, you no longer have to download a special app or hook it up to a computer. I was amazing it was so simple, I wanted to delete over 4000 photos at once without erasing my settings. I couldn't believe it was so easy to quickly do a bulk photo delete like this. Hopefully this simple tutorial walk through graphic shows you how to do it super quick:

  1. Open your Photos and click 'Select' in the top right.
  2. Rather than tapping each photo one at a time, slide right to select an entire row. This already saves a lot of time but we can do better...
  3. Slide right and then down at a right angle to select an array or rectangle of photos, you are drawing with your finger the rectangle you want to select. 
  4. Ok not bad but we can do better. Slide right and then down off the bottom of the screen, you can actually scroll to the bottom and select hundreds of photos at once to delete.

how to delete all iphone photos or lots at the same time
Simple steps to delete all or hundreds of iPhone photos at the same time without additional apps or hooking the phone up to a computer. Give it a try and comment below!

What do you think? Was this a simple way to delete lots of iPhone photos at the same time? Comment below if you like this tip!

Tagging Planets with Theodolite iPhone App

There's been a post going around Facebook about this amazing event: 5 planets visible in the same sky. It's pretty rare, but I think the pop social media crowd might be over estimating the excitement a little. Yes, all 5 naked-eye planets in our solar system are visible at the same time: Mercury, Venus, Mars, Saturn, and Jupiter.

They present themselves in a nice arc across the sky, but they're not all in the same field of view - at least not with my lenses. It's fun to imagine looking at the solar system side-on and all these planets in their respective orbits all on approximately the same side of the sun. But let's not get crazy.

Anyway, I couldn't get a photo of them all at once. So my group of 4 is still my best planet family photo. But I did use the app Theodolite to help me spot Mercury. I wasn't sure if it was over the roofline yet so I looked up it's current position on StarWalk and then used Theodolite to see if that would be over the roof. I confirmed with binoculars.


Theodolite and StarWalk are both on my top 13 astronomy and astrophotography app recommendations, so check them out!

theodolite screen shot mercury
Screen shot of Theodolite identifying approximate position of Mercury

venus with theodolite
Venus: Theodolite lets you export photos and it puts detailed information on the screen, this is a great way to tag and document the exact position of bright objects - still need to test it at night

jupiter with theodolite
Jupiter: Theodolite detailed position capture

Friday, January 8, 2016

Venus, Saturn, and Crescent Moon January 7, 2016

I woke up to a great collection of Venus and Saturn in a fairly close pairing alongside the 7.6% crescent moon on Thursday, January 7, 2016. There wasn't much foreground scenery to speak of - just my neighbor's roofline - but the collection looked cool floating over the houses in the cool morning air. The clear sky was a welcomed sight since we've been having a very rainy winter so far.

january 2016 moon venus saturn
Single frame Canon T5i, ISO 1600, 125mm, f/4.5, 2.5 sec

january 2016 moon venus saturn
Single frame Canon T5i, ISO 800, 125mm, f/4.5, 2.5 sec

The bright grouping looked like a nice target to try some iPhone photos, so I got out my tripod and adapter and used both the default camera app and Night Cap Pro. Night Cap Pro is great for low light, but the moon and Venus were very bright in this shot. I do like how Night Cap Pro was able to show some scenery with the houses rather than just the moon and Venus.

planets and moon with iphone
iPhone 6 photo with Night Cap Pro app, ISO 2000, f/2.2, 4.2mm, 1/2 sec
dslr vs iphone
This is a comparison of the DSLR photo (above) to the iPhone 6 with default camera app (bottom) at f/2.2, 4.2mm, ISO 2000, 1/15 sec showing the crescent moon with earthshine, Saturn, and Venus clearly visible.
Between the two, I like the wider photo with houses for context even though the moon isn't properly exposed and turns into a large white blob. It's kinda cool. It looks like glowing orbs, UFOs, or just a huge star above the house. I try not to post too many photos straight out of the iPhone to Instagram because I know that they're just blobs - I get it - but it's fun to play with and test out what the iPhone camera is capable of without any fancy gadgets or attachments.

Sunday, January 3, 2016

Super Easy Star Trail Photos with iPhone

Making star trail photos with an iPhone used to be an ordeal, but now you can do it all from a single app. I use Night Cap Pro for my high ISO long exposure iPhone photos, it's specifically designed with night sky photos in mind. Another thing that really helps is a tripod adapter for your iPhone to keep everything stable and secure while letting you aim it just how you like. You don't NEED one, you can prop your phone up against something, but it makes everything easier. For an iPhone tripod adapter you can go super cheap with a home made one or just buy the perfect one on Amazon.

universal smartphone tripod adapter
Vastar universal smartphone tripod adapter and a long iPhone power cord to keep things going in the cold. This is an iPhone 6 and I even left the case on, and the adapter still works with it.


long exposure stars iphonestar streak trail photos

Above photos are star trails taken with the iPhone on a tripod mount, completely in-app using Night Cap Pro, no additional stacking or exporting the photos. It's a single long exposure using the light trail mode in the app. I tweaked the photo on the left a little bit, and the one on the right is exactly as it came out un-edited.

iphone tripod connector
The battery drains fast if it's cold out, so the power cord is helpful if you are near an outlet

Saturday, December 26, 2015

Christmas Full Moon with iPhone and DSLR Eyefi Wireless Card

We had clear skies for the Christmas full moon, incidentally the first full moon on Christmas day since 1977. Testing out two of my new Christmas presents on Christmas evening, I got this amazing universal smartphone tripod adapter mount. There are a lot of them on Amazon, it looks like some company is making them wholesale and other companies are stamping their logo on them. Either way, it's the only tripod adapter you'll need, it's so easy to pop my iPhone in and out without removing the case.

So let's check out the full moon on Christmas with both the iPhone on a tripod (with no additional lenses) compared to the Canon T5i (single frame no stacking) sent straight to my phone from the Eyefi wireless memory card

iphone moon compared to dslr
iPhone (Left) photo with no additional lenses vs. Canon T5i (right) single frame no stacking. Both pumped up using Instagram's Structure tool and a tiny bit of contrast.

Check it out! I got quite a bit of detail on the face of the moon with just the iPhone itself and no digiscoping or additional lenses or anything. I used the Manual camera app to adjust the exposure and focus similar to this description except this is just a single frame no stacking.

Here's a closer look at the tripod adapter. The top extends out to clip around larger phones and it has a spring in it that pulls the clamp back down for a snug grip. It's perfect for time lapses or ISS passes or anything else you need a tripod for. It's more convenient than this Glif mount because you don't have to take it out of the case.

smartphone tripod mountsmartphone tripod mount

The Eyefi wireless memory card is another cool gift I was excited about. It lets you transfer photos directly from the memory card to your phone over its own WiFi signal (you don't have to be on the internet at home, you can be in the middle of the desert).

For me, this means I can cut out the step of running to the computer to transfer images in iPhoto and then dropping them into Box just so I can tweet or Instagram something. I've done this a few times with eclipses when I wanted to share a lunar eclipse photo - I had to run in and transfer everything quick and run back out. With the Eyefi I can get the photo on my phone and cut out the middle man. I'm also looking forward to this for sports photography. I took photos of an intramural basketball championship and could have tweeted out the winners' photos right away rather than waiting.

eyefi card
The Eyefi memory card has its own wireless network signal it can use to transfer photos directly from your camera to your phone instantly without loading them onto a computer first.
canon wifi display
This symbol on the back of the camera (yellow) means I'm connected to the card with my phone. It was easy to set up, the only confusing part was that it didn't work in RAW, it only connects and transfers with JPEG so it's good for quick moon photos or sporting events, but not something that will replace a stack of RAW files.
iphone christmas moon
iPhone photo straight from the camera, 3x digital zoom, Manual app, iPhone 6, f/2.2, 1/670 sec, ISO 32, 4mm
canon dslr christmas moon
Canon T5i single frame, f/5.6, 1/500 sec, ISO 100, 300mm

Saturday, September 19, 2015

#MoonNight and Science Friday Shoutout

I got a shoutout from Science Friday on Twitter the other day! There is some buzz about International Observe the Moon Night (tonight, September 19, 2015), and Science Friday was looking back at their content from a segment I did on the air. I still remember that day, what a fun opportunity.


I replied with this photo (below) and a link to my article about taking even better moon photos with an iPhone by using video mode. I made the photo just for Twitter and it got quite a few retweets so I thought I'd also post it here.

sharp iphone moon video
Comparing a single frame of iPhone video to a stack of 115 frames taken from a 3 second AVI video file


I didn't realize until just now, but I've actually done some observing / photography on International Observe the Moon Night every time for the past 3 years - and usually just as a coincidence. Here are my posts from 2012, 2013, and 2014. Who knew I was being so inadvertently consistent!

For posterity, here is my moon photo from tonight, a combination of 20 frames each at f/8, 1/60 sec, ISO 100, 300mm. It's a little rushed, I'm not sure if that's why it's a little fuzzy or if it was the atmosphere. Blame it on the atmosphere!

observe the moon night
Observe the Moon Night 2015

Tuesday, September 15, 2015

Night Sky iPhone Photos with In-App Star Trails

I woke up last night to let the dog out and got distracted by the rising Winter Hexagon of stars. I can't wait to see this part of the sky on the regular later this winter. It's a particularly good target for iPhone night sky photos because the bright stars show up well even on the tiny iPhone camera.

I propped the iPhone up on a small stand (the same one I used here). The app I used is called Night Cap Pro and it does a great job!

iphone star trails
Same photo as below, but I turned the brightness down a little bit to make the sky less pale gray and make the stars pop.
iphone star trails
Same photo as above straight out of the iPhone, all star trails are done in-app with long exposure. This was about 10 minutes. That bright blob to the bottom left just coming over the roof is Venus, the rest is Orion, Gemini, and some planes.
orion and gemini with iphone
I also used the star trail mode to make this image. The star trail mode actually does a better job than the noise reduction mode at cleaning up the sky for a nice regular star photo. This was about 20 seconds and you can just barely see trails.
pleiades and perseus with iphone
I put the phone off the side of the table and pointed it straight up to see how it would do without light pollution on the horizon. I was so happy to see my favorite constellation Perseus and the instantly recognizable Pleiades cluster. So cool even on an iPhone photo! This one is also straight out of the camera.

Sunday, September 6, 2015

iPhone Moon Photo Process and Settings with Manual Camera App

This post describes the process and app settings I used to take a properly exposed photo of the moon using an iPhone 6 without additional lenses or digiscoping methods - essentially straight from the camera. This is the process with no external or extra lens attached to the iPhone. I'll break down the process into the sections of Setup, Settings, and Production. So first, let's look at the setup.

Setup

My setup tonight was just my iPhone 6 with no additional lenses - but that doesn't mean no additional gear at all. I used a piece of plastic that I think was originally meant to hold up your phone if you are watching a movie. I also used my headphone volume shutter release made from a pair of iPhone headphones (basically just the headphones with the earbuds cut off but keeping the volume button as a shutter remote).

iphone night sky photographyiphone night sky photography


Settings

Next, let's look at the app and settings. I used an app called Manual - Custom exposure camera by Little Pixels. I manually adjusted the shutter speed to 1/250 seconds and the ISO to 34. I left the focus on Auto. Then I zoomed in by touching 2 fingers to the display area and spreading them apart. I zoomed all the way in to 3x digital zoom. Digital zoom isn't going to make my actual moon photo any bigger, but it will help me see the exposure better before I take my photos.

These settings worked for my waning crescent moon, which is dimmer than a full moon. If the moon is fuller and brighter you'll want to use an even shorter shutter. The moon is relatively bright, and a lot of times people think they need a long shutter to take night photos, but if you use a long shutter on the moon it will be washed out and over exposed.
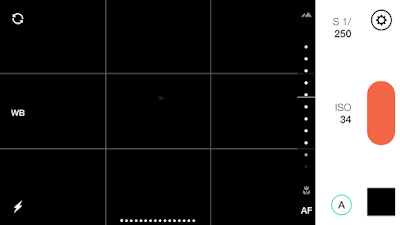
manual camera app
In the image data, ISO 34 actually shows up at ISO 32, but hey it's close enough!

Production

I took 18 photos back to back quickly with my volume button on the Apple headphones. I uploaded them to Box so I would have them on my laptop.

I opened the photos in a program called Registax, it's free software that lets you stack multiple photos on top of each other to average out the noise in each image leaving a better approximation (the average) of what is truly there beyond the distortion.

I used 3 alignment points because the face of the moon is so small in the iPhone photos. I didn't tweak much, but it did clean up the image a bit.
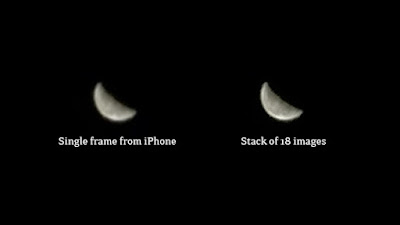
iphone moon photo
Stacking the iPhone moon photos wasn't exactly a waste of time, it did manage to clear it up a bit

I normally do a High Pass layer and make all kinds of subtle adjustments in Photoshop, but there just isn't a whole lot to work with here, so I desaturated the moon to get rid of the yellow and that's it!
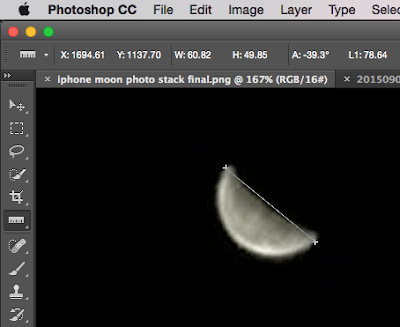
how big is the moon in iphone photo
I measured the diameter of the moon in the iPhone photo at about 78 pixels, let's round up to 80. 

The moon is about 80 pixels in diameter. This is an improvement from when I tried this on the iPhone 5, in which case the moon was about 50 pixels in diameter.
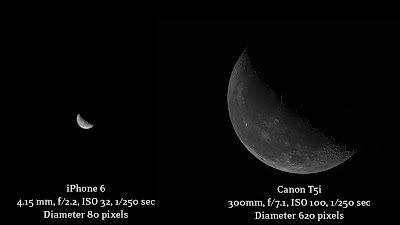
iphone vs dslr moon photo
Side by side look at the final product using the iPhone 6 compared to my Canon T5i

As you can see, taking moon photos on the iPhone with the regular camera lens leaves you wanting more. Granted, there isn't much to look at on the waning crescent side of the moon's face, and with a full moon you can at least see a little bit more contrast in the iPhone image. But when you look at it next to a 'regular' moon photo, in this case one taken with my Canon T5i DSLR on the same night, it's painfully obvious that the iPhone is better used for digiscoping the moon and not taking photos outright.

Sunday, August 30, 2015

Quick Moongazing and iPhone Digiscoping

We had a nice clear view of a 95% waxing gibbous moon on Thursday evening (8/27/2015), and our friend Kenny said he wanted to check out my telescope. I usually jump all over those suggestions because I loving sharing this hobby! I told him to grab the binoculars first while I got my scope out of the office [side note: I think I'm going to start referring to our third bedroom office as my 'study' because it sounds super sophisticated and intellectual].

observing the moon


We looked through my Meade 285 refractor for a little bit with both my go-to Meade MA 25mm eyepiece, and my more powerful Orion 6mm Expanse eyepiece. I think Kenny was surprised with how quickly the moon appeared to move through the field of view, and I showed him how I had to adjust the scope to compensate since it doesn't have a motor drive. We saw craters along the terminator, and Kenny thought it would be so creepy if we saw lights flashing back at us.

moon with iphone through 6mm eyepiecegrimaldi crater iphone

iphone moon crater 6mm eyepieceiphone moon crater labels

backyard moongazing

white meade 285 telescope

white meade 285 telescope

I took a video of how hard it is to keep an iPhone centered over the eyepiece just right in order to look through the telescope. Yes, I do have an adapter that could have made my life easier, but I was trying to do it quick because we were being eaten alive by mosquitoes! I think I got 5 mosquito bites in the short time we were outside - thanks to our record-setting June rainfall.

A video posted by Eric Teske (@ericteske) on