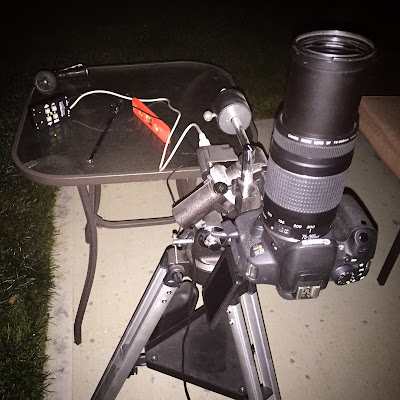
Wednesday, November 4, 2015

Canon DSLR Astrophotography: Andromeda Galaxy Improvements

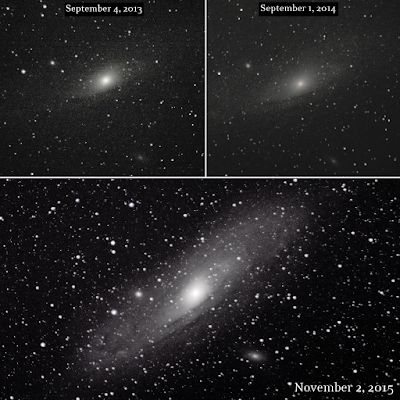
The last time I tried to image the Andromeda Galaxy (M31), I was still just testing out my Orion EQ-1 mount and trying to learn how to align and how it all worked. That time I only took 9 light frames and got my (at the time) best image stacked. Just 9 frames! That shows the benefit of the motor-driven mount for sure. But since then my Canon DSLR astrophotography has gotten a little better.

After I learned the mount a little, I imaged the Orion Nebula (every beginner's favorite target I'm pretty sure), but didn't go back to Andromeda.... UNTIL NOW! Last night I did a proper treatment of M31 high in the sky directly overhead and with very favorable conditions. Here's how it went down.
Canon DSLR astrophotography
Sometimes you don't realize how far you've come until you look back.

I aligned slightly to the bottom left of Polaris. Without cross hairs or a finder scope, I'm really just aiming at the center focal point through the viewfinder and hoping for an approximate alignment. I think my best is about 20 seconds, but that night I got 13 seconds without star trails. Not great, but not bad for a simple motor. I bumped it a few times and I'm sure I knocked it out of focus a bit, especially with this lens that seems to jump if you touch it.

Next I had to find Andromeda, but since it was directly overhead, I couldn't do my usual technique of star hopping through the viewfinder. In fact, I couldn't even get my head under the viewfinder. I pulled out the folding screen (this thing has saved my butt a few times) and just started firing off test shots in the general direction. It only took me 16 shots to find the fuzzy blob and then I zeroed in on it.
Canon DSLR astrophotography
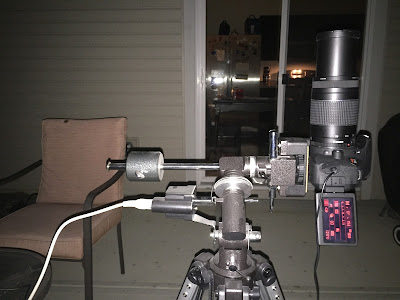
Canon T5i on Orion EQ-1 motorized mount (single speed, no tracking)
canon DSLR on motor tripod mount
If it looks awkward, that's because it was! I couldn't even see through the viewfinder, I had to just guess and click around for a little while to find my target.
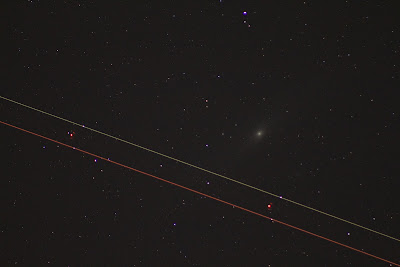
I wanted to at least give M31 equal treatment compared to my Orion shot that I love so much, so I let it click away for about 30 minutes doing 160 or so 13 second exposures. Individual frames look like this one (although not all have an airplane buzzing the fuzzy galaxy blob). Quite a close approach considering the field of view is around 5 degrees.
andromeda airplane
One of the frames I had to throw out, but kind of a unique image that shows what Andromeda looks like in a single 13 second exposure, and a near miss from an airplane. 

The first thing I did after stacking in DSS (total exposure time 31 min 24 sec) was to crank the curves all the way up just to see what might be hiding in there. I don't use this as a final product, but it is a quick way to see what to shoot for in Photoshop teasing it out bit by bit with curves to avoid the grain of this rough pass. This also proves that I'm not just drawing an oval around the center and turning up the brightness! It really is that bright compared to the surrounding sky. It looks like I just drew a ring around it, but that's really the galaxy itself!
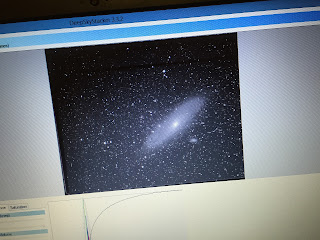
canon dslr andromeda galaxy
Cranked the curves all the way up in DSS just to get an idea of what might be hiding in the pixels. It's too grainy to use, but gives me something to shoot for in Photoshop where I have to tease it out bit by bit to avoid the quick-and-dirty grain from the DSS pass at it.
I'm a little rusty at deep sky stuff. I used curves in Photoshop to tease out the contrast between the dust trails and the brighter parts. I spent about 2 hours on it. My best Andromeda Galaxy (M31) by far! I'm a little rusty on the post processing, but the motor driven mount is night and day compared to a fixed tripod. Really pleased! Might even get a print!
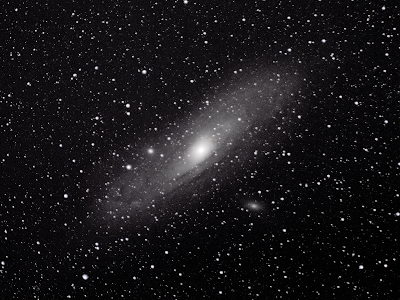
canon dslr andromeda galaxy
Canon T5i on Orion EQ-1 mount, stacked in DSS, 159 subs at 13 sec, f/5.6, ISO 1600, 300mm; 27 dark frames, 24 bias, and 15 flat frames (re-used the ones from last year and they seemed to work just fine).
Take your vitamins and don't skip the flat frames! I'll never go back to not using flat frames on anything that I'm seriously trying to improve on.

Active Sunspot Region 2443

Had thin clouds on Sunday but I wanted to try to get a photo of active sunspot region 2443 that I've been hearing so much about. I haven't taken many sun photos with my DIY solar filter for my DSLR, but when there is an especially large active region they are fun to catch.

I had a little haze - well, more than haze, I had thin clouds I was trying to shoot through. The sunspot active region was large enough to see even though the clouds without a telescope. I just used a 300mm lens with the DIY solar filter over the top.

The hardest part is focusing with the additional filter over the lens and the glare of trying to look at the camera display screen in the daylight. Auto focus doesn't quite do it with the additional layer over it, of course the clouds don't help either.

November is looking good for some stargazing, but I don't think I'll be taking many more solar images during the week. By the time I get home it's already getting dark!

sunspot through clouds
Active sunspot region 2443 on Sunday, November 1, 2015 - Single shot with Canon T5i edited in Instagram
Instagram actually does a good job bringing out the contrast in sunspot images. I didn't list the acquisition details under the image above because I cheated it too much. Below is the original image out of the camera, which in this case is my trusty Canon T5i.

300mm sun image
Canon T5i single frame at f/7.1, 1/30 sec, ISO 100, 300mm

For comparison, here is a look at what the face of the sun looked like at the same time, but through much better gear from the Solar and Heliospheric Observatory (SOHO).

soho image

And if you were wondering, this is what my setup looked like. Identical to my setup last year, but with worse atmospheric conditions. In both cases, stacking actually didn't do much good and I ended up using single images.

canon solar filter
Canon T5i and home made solar filter attachment

Wednesday, October 14, 2015

Traffic Jam of Planets in Morning Rush Hour Sky

Look to the East just before sunrise to see a veritable traffic jam of planets rising above the horizon. I snapped this photo of 4 planets all in one shot yesterday at 7:09am in Indiana. Quite the collection! I believe 4 planets in one shot is my record (5 if you count the houses that are here on planet Earth).

Keep an eye on this group over the next few weeks. Jupiter, Venus, and Mars will get closer together and will be joined again by the moon on November 6 - November 7, 2015.

4 planets in one shot with labels

morning conjunction
Canon T5i, ISO 400, 24mm, f/5.6, 5 sec

The moon will join the party again on the mornings of November 6th and 7th but by then Mercury will tuck back down below the horizon. See ya later Mercury!

november 2015 conjunction
Moon joins the conjunction of Jupiter, Mars, and Venus on November 6-7, 2015

Crop and Zoom Your Way to Better Sunset Photos Without Photoshop

This might seem obvious after you hear it, but I have been playing around with my sunset photos and I noticed that the very best sunsets are the ones that fill the entire sky with eerie wisps of colorful feathery fire. Sometimes the area near the horizon is gorgeous, but snapping a wide angle photo just doesn't do it justice. Wide angle sunset photos clog up Instagram and *totally get like zero likes, amiright!?* - eh hem. So what can be done?

I like to use a zoom lens to fill the entire frame with the good stuff and crop out the boring regular clouds. This gives the impression of a sky filled with amazing color floor to ceiling, when really it could just be a thin band of color near the horizon. It's not cheating, it's composition!

You can use this technique to get some amazing sunset shots without being tempted to juice up the magic in Photoshop. Don't touch the saturation or contrast, just adjust the framing.

I went back in time through my archives to look for wide angle versions of my favorite sunset photos to show the difference. It's sort of a behind the scenes look at what the sky 'really' looked like. 

blue and red sunset
Canon T5i aperture priority mode (Av), ISO 400, 33mm cropped, f/4.5, 1/200 sec
gray and red sunset
Canon T5i aperture priority mode (Av), ISO 400, 18mm, f/4, 1/50 sec

Now you might be thinking, "come on Eric, you aren't using the same camera settings, that's not fair to attribute the better photo to the focal length and not the exposure." To which I would say I was shooting in aperture priority (Av) mode which means the camera is doing the work calculating the best exposure for what is in frame - so when I have more gray clouds in frame it tries to accommodate those as well. Tightening the shot by zooming in was the easiest and fastest way to get a better sunset photo. 

Let's try another one, here we see an unusual sky color - on it's own not bad. But next we see it being used as an abstract background that fills the entire frame.

meh sunset
Canon T5i, ISO 800, 53mm, f/5.6, 1/800 sec
abstract sunset
Canon T5i, ISO 800, 300mm, f/5.6, 1/250 sec

Ok, I saved my best for third - this example really drives home the point because both the wide and tight shot use the same ISO and shutter speed. You can clearly see in the wide angle shot that the sunset is neat but nowhere near as mind blowing as the tighter shot leads you to believe. It looks like the entire sky is blood red, when really it's just a strip near the horizon. Nevertheless, it makes a nice backdrop for the utility pole - can you spot the pole down by the horizon in the wide angle shot?

sunset wide angle not impressive
Canon Rebel XT, ISO 400, 18mm, f/4.5, 1/50 sec

red sunset
Canon Rebel XT, ISO 400, 300mm, f/5.6, 1/50 sec

So there you have it - some examples of how shooting sunsets close to the horizon can make a thin strip of color look like a magical magnificent sunset.

Saturday, October 10, 2015

October 9, 2015 Conjunction: Moon, Mars, Venus, Jupiter

Chris texted me to go outside and look at the moon and a bunch of stars. When I got out there I noticed a conjunction between the crescent moon, Venus and Jupiter, and I didn't notice until I looked it up in my StarWalk app that Mars was in the mix as well!

The 3 planets show up well in photos, and the white/blue star Regulus is a nice addition as well. I had some thin clouds obstructing my view, but that made for an interesting glowing orb effect in the longer exposures. Venus looks like a smaller second moon glowing in the morning sky!

october 9 2015 conjunction
Cropped single shot from Canon T5i - f/5.6, 6 sec, ISO 800, 34mm

moon and planets over houses
Single shot Canon T5i, f/5.6, 6 sec, ISO 800, 34mm

moon mars venus jupiter conjunction
Single shot Canon T5i, f/5.6, ISO 400, 55mm, 1.3 sec